
Showing posts with label travelers notebook. Show all posts
Showing posts with label travelers notebook. Show all posts
Friday, 13 July 2018
Friday, 6 July 2018
A New journal
I was sent a beautiful new something to share with you. Spoiler alert....it's lovely ha ha! If you would like to check out this company you can find them at: https://www.etsy.com/uk/shop/rkivejournals or https://www.instagram.com/r_kivejournals/
PLEASE NOTE: I was given this / these product(s) in exchange for my honest review and opinion, the fact that I was given these does not alter my opinion in anyway. This review is my own personal opinion on the product / company, given in good faith and has not be sponsored or endorsed. None of the links are affiliate links. Unless otherwise stated, all photography is my own
PLEASE NOTE: I was given this / these product(s) in exchange for my honest review and opinion, the fact that I was given these does not alter my opinion in anyway. This review is my own personal opinion on the product / company, given in good faith and has not be sponsored or endorsed. None of the links are affiliate links. Unless otherwise stated, all photography is my own
Friday, 25 May 2018
Setting up my new B6 Travelers Notebook
Today I am sharing with you my new B6 Travelers Notebook and also how I am setting this up (process video). I will do another video talking you through my set up and why!
Wednesday, 21 February 2018
Getting the creative mojo back!
Hey guys!
I cannot believe we are half way through February already! The past few weeks have really zipped by, I'm already behind on my daily journalling....oops!
So I've been struggling a bit lately with my creativity, I've not journaled properly since Christmas. I've kept a log of what we've done, in a really informal, unattractive way. So if I feel the urge I can go back and journal, but at the minute I just keep thinking '...Nope'. So I've been exploring and doing other things which involve some level of creativity. I've spent a few hours (read that as days) playing on The Sims4 and doing some Tumblr ish type DIY projects with Anna's Patreon content for this month. I just can't get enough!
Our house has been in a perpetual state of undress for the last five years, we've been slowly, and I mean slooowly doing it up. I've put so many things on hold, kept things in boxes waiting. It has frustrated me to no end, as I feel like I never properly moved in and that the place doesn't feel quite like home. We've recently had the builders in to sort our front porch extension and it has pushed me to open these boxes up and get stuck into the projects I've put off for so long.

I have a real passion for photography and where I can I try to display my own work (vain much haha!) but I also love seeing generational gallery walls. You know the ones that show you from a chubby baby, through the goofy school years and finally to that awful graduation photo! My parents have one on either side of their stairs, us toothy grinned offspring and family from a bygone era. I would love just sitting on the stairs and looking over their faces as a kid and m any a time you'd hear guests make it only half way up the steps, a picture having caught their attention.


I've hoarded frame after frame and printed many a photo in preparation for my own wall, and I'm now almost there! So with a rather good looking Mancunian builder giving me a rather peculiar look, I took some frames I picked up from a poundshop and spray painted them using some spray paint from my stash. I could have gone with and kept the black frames but I felt since these were going to be arty type prints I wanted something to distinguish them from the awkward (but amazing) family shots.


They are currently drying as I'm writing this, so fingers crossed they'll be okay out there! Otherwise they may have some interesting smudges, or flecks which if I really hate I can always cover over with another coat. Woohoo for spray paints.

Whilst waiting for them to dry I picked out some of my favourite pieces from this month's patreon and did some editing on the computer to add some phrases. I'm not the best with digital editing but I think they came out okay, good enough for me anyhow. I then printed and cut them to the right size. I will re-esemble them once the paint is dry....*waits*.

In the meantime I turned my attention to my other project, a fabric TN. Some lovely canvas with one Anna's Dirty Pours (I still can't say that without cringing lol) printed on to it was THE thing.

I teamed it with a turquoisey blue interior, I did consider a black fabric but I think the blue was the better choice. I'm over the moon with how it turned out, it looked amazing just as a fabric print but seeing it made up as an item it is just incredible.


It now houses my affirmations journals, which are full of swirly whirly watercolour pages. Perfect Match!

Well that's all from me this month. I've had fun finding other avenues for my creativity and I feel less guilt for not creating. I'm not the only one that suffers from this am I? I'd love to hear the ways you get yourself through the creativity slump :)
Till next time peeps x
You can also find me on Instagram and on my blog

I cannot believe we are half way through February already! The past few weeks have really zipped by, I'm already behind on my daily journalling....oops!
So I've been struggling a bit lately with my creativity, I've not journaled properly since Christmas. I've kept a log of what we've done, in a really informal, unattractive way. So if I feel the urge I can go back and journal, but at the minute I just keep thinking '...Nope'. So I've been exploring and doing other things which involve some level of creativity. I've spent a few hours (read that as days) playing on The Sims4 and doing some Tumblr ish type DIY projects with Anna's Patreon content for this month. I just can't get enough!
Our house has been in a perpetual state of undress for the last five years, we've been slowly, and I mean slooowly doing it up. I've put so many things on hold, kept things in boxes waiting. It has frustrated me to no end, as I feel like I never properly moved in and that the place doesn't feel quite like home. We've recently had the builders in to sort our front porch extension and it has pushed me to open these boxes up and get stuck into the projects I've put off for so long.


I've hoarded frame after frame and printed many a photo in preparation for my own wall, and I'm now almost there! So with a rather good looking Mancunian builder giving me a rather peculiar look, I took some frames I picked up from a poundshop and spray painted them using some spray paint from my stash. I could have gone with and kept the black frames but I felt since these were going to be arty type prints I wanted something to distinguish them from the awkward (but amazing) family shots.


They are currently drying as I'm writing this, so fingers crossed they'll be okay out there! Otherwise they may have some interesting smudges, or flecks which if I really hate I can always cover over with another coat. Woohoo for spray paints.


In the meantime I turned my attention to my other project, a fabric TN. Some lovely canvas with one Anna's Dirty Pours (I still can't say that without cringing lol) printed on to it was THE thing.

I teamed it with a turquoisey blue interior, I did consider a black fabric but I think the blue was the better choice. I'm over the moon with how it turned out, it looked amazing just as a fabric print but seeing it made up as an item it is just incredible.


It now houses my affirmations journals, which are full of swirly whirly watercolour pages. Perfect Match!

Till next time peeps x
You can also find me on Instagram and on my blog

Thursday, 1 February 2018
How to make a dashboard for your travelers notebook
Hi Everyone
I was very kindly sent a Lollipop box for sharing with you guys and it was right up my street...
This was my first time receiving a box and I have to say that it was amazing! I am a massive cloud lover and a cloud fan so this box was just perfect for me. In fact you could probably say that it was just a little too perfect. How so? Well I just wanted to hoard all the things, keep them precious and not use them. I am pretty sure some of you crafty folk can relate to that, come on own up now, surely there is something crafty you are hoarding for that perfect project?
Well here is what I have learnt in the many years that I have been crafting. That perfect project rarely exists. Usually what happens is that your hoarded item gets forgotten about and when found is either not to your taste or has gone dog eared or such. Then you kick yourself for not using it and wish you had.
I came up with a way to hoard my beloved papers but not hoard them all at the same time. I turn my papers into dashboards for my planners and journals that way I always have them and can look at them all the time and they are preserved. Then when I grow tired of them I move them on.
So if you have a travelers notebook and what like to do the same as me I have a tutorial in the video below on how to make your own dashboard. It is a super quick and easy project to do but one you will love!
You can use whatever you like to decorate your dashboard but you need to make sure it is flat to go through the laminator. The forever dreaming kit was particularly lovely because it helps us to aspire us to 'dream big' and what better positive affirmation to look at when you open your planner on a daily basis!

To decorate mine I decided to deconstruct the paper clip that came in the box. Not because I didn't like it, I really do and it is because I love it that I wanted to use it on my dashboard. I have a few cloud clips so I didn't mind loosing one to this project. Be warned...these paper clips are incredibly well made and as such I had a lot of difficulty in deconstructing it lol!


I was very kindly sent a Lollipop box for sharing with you guys and it was right up my street...
This was my first time receiving a box and I have to say that it was amazing! I am a massive cloud lover and a cloud fan so this box was just perfect for me. In fact you could probably say that it was just a little too perfect. How so? Well I just wanted to hoard all the things, keep them precious and not use them. I am pretty sure some of you crafty folk can relate to that, come on own up now, surely there is something crafty you are hoarding for that perfect project?
Well here is what I have learnt in the many years that I have been crafting. That perfect project rarely exists. Usually what happens is that your hoarded item gets forgotten about and when found is either not to your taste or has gone dog eared or such. Then you kick yourself for not using it and wish you had.
I came up with a way to hoard my beloved papers but not hoard them all at the same time. I turn my papers into dashboards for my planners and journals that way I always have them and can look at them all the time and they are preserved. Then when I grow tired of them I move them on.
So if you have a travelers notebook and what like to do the same as me I have a tutorial in the video below on how to make your own dashboard. It is a super quick and easy project to do but one you will love!


I am absolutely thrilled with how it turned out, it really makes my soul incredibly happy! I still have some of the cloud paper left too so I need to think about how I can use it. I don't very often read physical books but if I did it would make a great book mark. I will probably use it as ephemera in my journal.

I hope you enjoyed my little tutorial and seeing my planner pages taking shape. If you decided to make your own dashboard I would love to see your photos if you care to tag me or share with me on social media. I will never tire of looking at clouds and planners with clouds lol!
Sunday, 3 December 2017
Travelers Notebook insert size guide
At the Jingle & Mingle event yesterday we made travelers notebook inserts. I made a size guide template and I thought I would share it with you, my lovely blog readers in case it is of any help to you!
This is set up for A4 paper - make sure you turn off any 'shrink to fit' settings and print 'as is' with borderless printing.

Thursday, 23 November 2017
How I prep for December Daily (In my Travelers Notebook)
In this chatty video I talk you through how I prepare for Decemeber Daily although I prefer 'Christmas Memory Keeping' as I go beyond just every day in December. Most of the items I show you in terms of stickers, paper and die cuts are in stock (or have been at some point) in my own online shop: https://www.mrsbrimbles.co.uk/product-category/seasonal/christmas-winter/
I get asked a lot about my Travelers Notebook and it is from: https://www.etsy.com/uk/shop/Geekydori?ref=ss_profile and the mint A5 one is from: http://www.itspaperdear.com/
If you would like tutorials on how to make your own inserts you can watch my two videos: https://www.youtube.com/watch?v=xN8dhsplp-c&t=734s and: https://www.youtube.com/watch?v=mR93VS7kWQQ&t=598s
Sunday, 19 November 2017
Travelers Notebook Kit from Craftin Chaos
I am sharing with you a Travelers Notebook kit from the lovely Deb at Craftin' Chaos. International peeps...she is based in the US BUT does ship internationally, you just have to email her so she can work out how much it will cost.
https://www.etsy.com/shop/craftinchaos
PLEASE NOTE: I was given this / these product(s) in exchange for my honest review and opinion, the fact that I was given these does not alter my opinion in anyway. This review is my own personal opionion on the product / company, given in good faith and has not be sponsored or endorsed. None of the links are affiliate links. Unless otherwise stated, all photography is my own.
Tuesday, 7 November 2017
Making your own travelers notebook and journals
As you know I was recently sent the big shot machine from Sizzix and dies to make a small book and a travelers notebook with. In these videos I show you how to make the books but also give you an in depth chat about the issues I had and my tips on making it.
I was very kindly sent a box of goodies from Sizzix to share with you all and to make and share as a result. The itesa you see are available to purchase from: https://www.sizzix.co.uk/ and https://www.hochanda.com/or https://www.sizzix.com/ if you are in the US as well as other scrapbook companies.
PLEASE NOTE: I was given this / these product(s) in exchange for my honest review and opinion, the fact that I was given these does not alter my opinion in anyway. This review is my own personal opionion on the product / company, given in good faith and has not be sponsored or endorsed. None of the links are affiliate links. Unless otherwise stated, all photography is my own.
Monday, 6 November 2017
Making travellers notebook inserts
Hiya folks!
At the end of September I was full of determination to take part in October Daily and journal regularly in a special traveller's notebook insert to celebrate the change in season. Unfortunately I was not able to do the project justice and failed to keep up with writing every day, as October became an extremely busy month for me. One of the reasons for distraction was a wonderful holiday to New York that I took with my fella, the documentation of which has its very own journal that I will be showing you folks at some point soon. However, I did bind together a fun insert and I am excited to show you some of it today. The cover is made from some autumnal scrapbook paper that I have been hanging on to for absolutely ages decorated with Anna's watercolour fox from her September Patreon collection of collage elements that are still available to you should you sign up now - how great is that?!

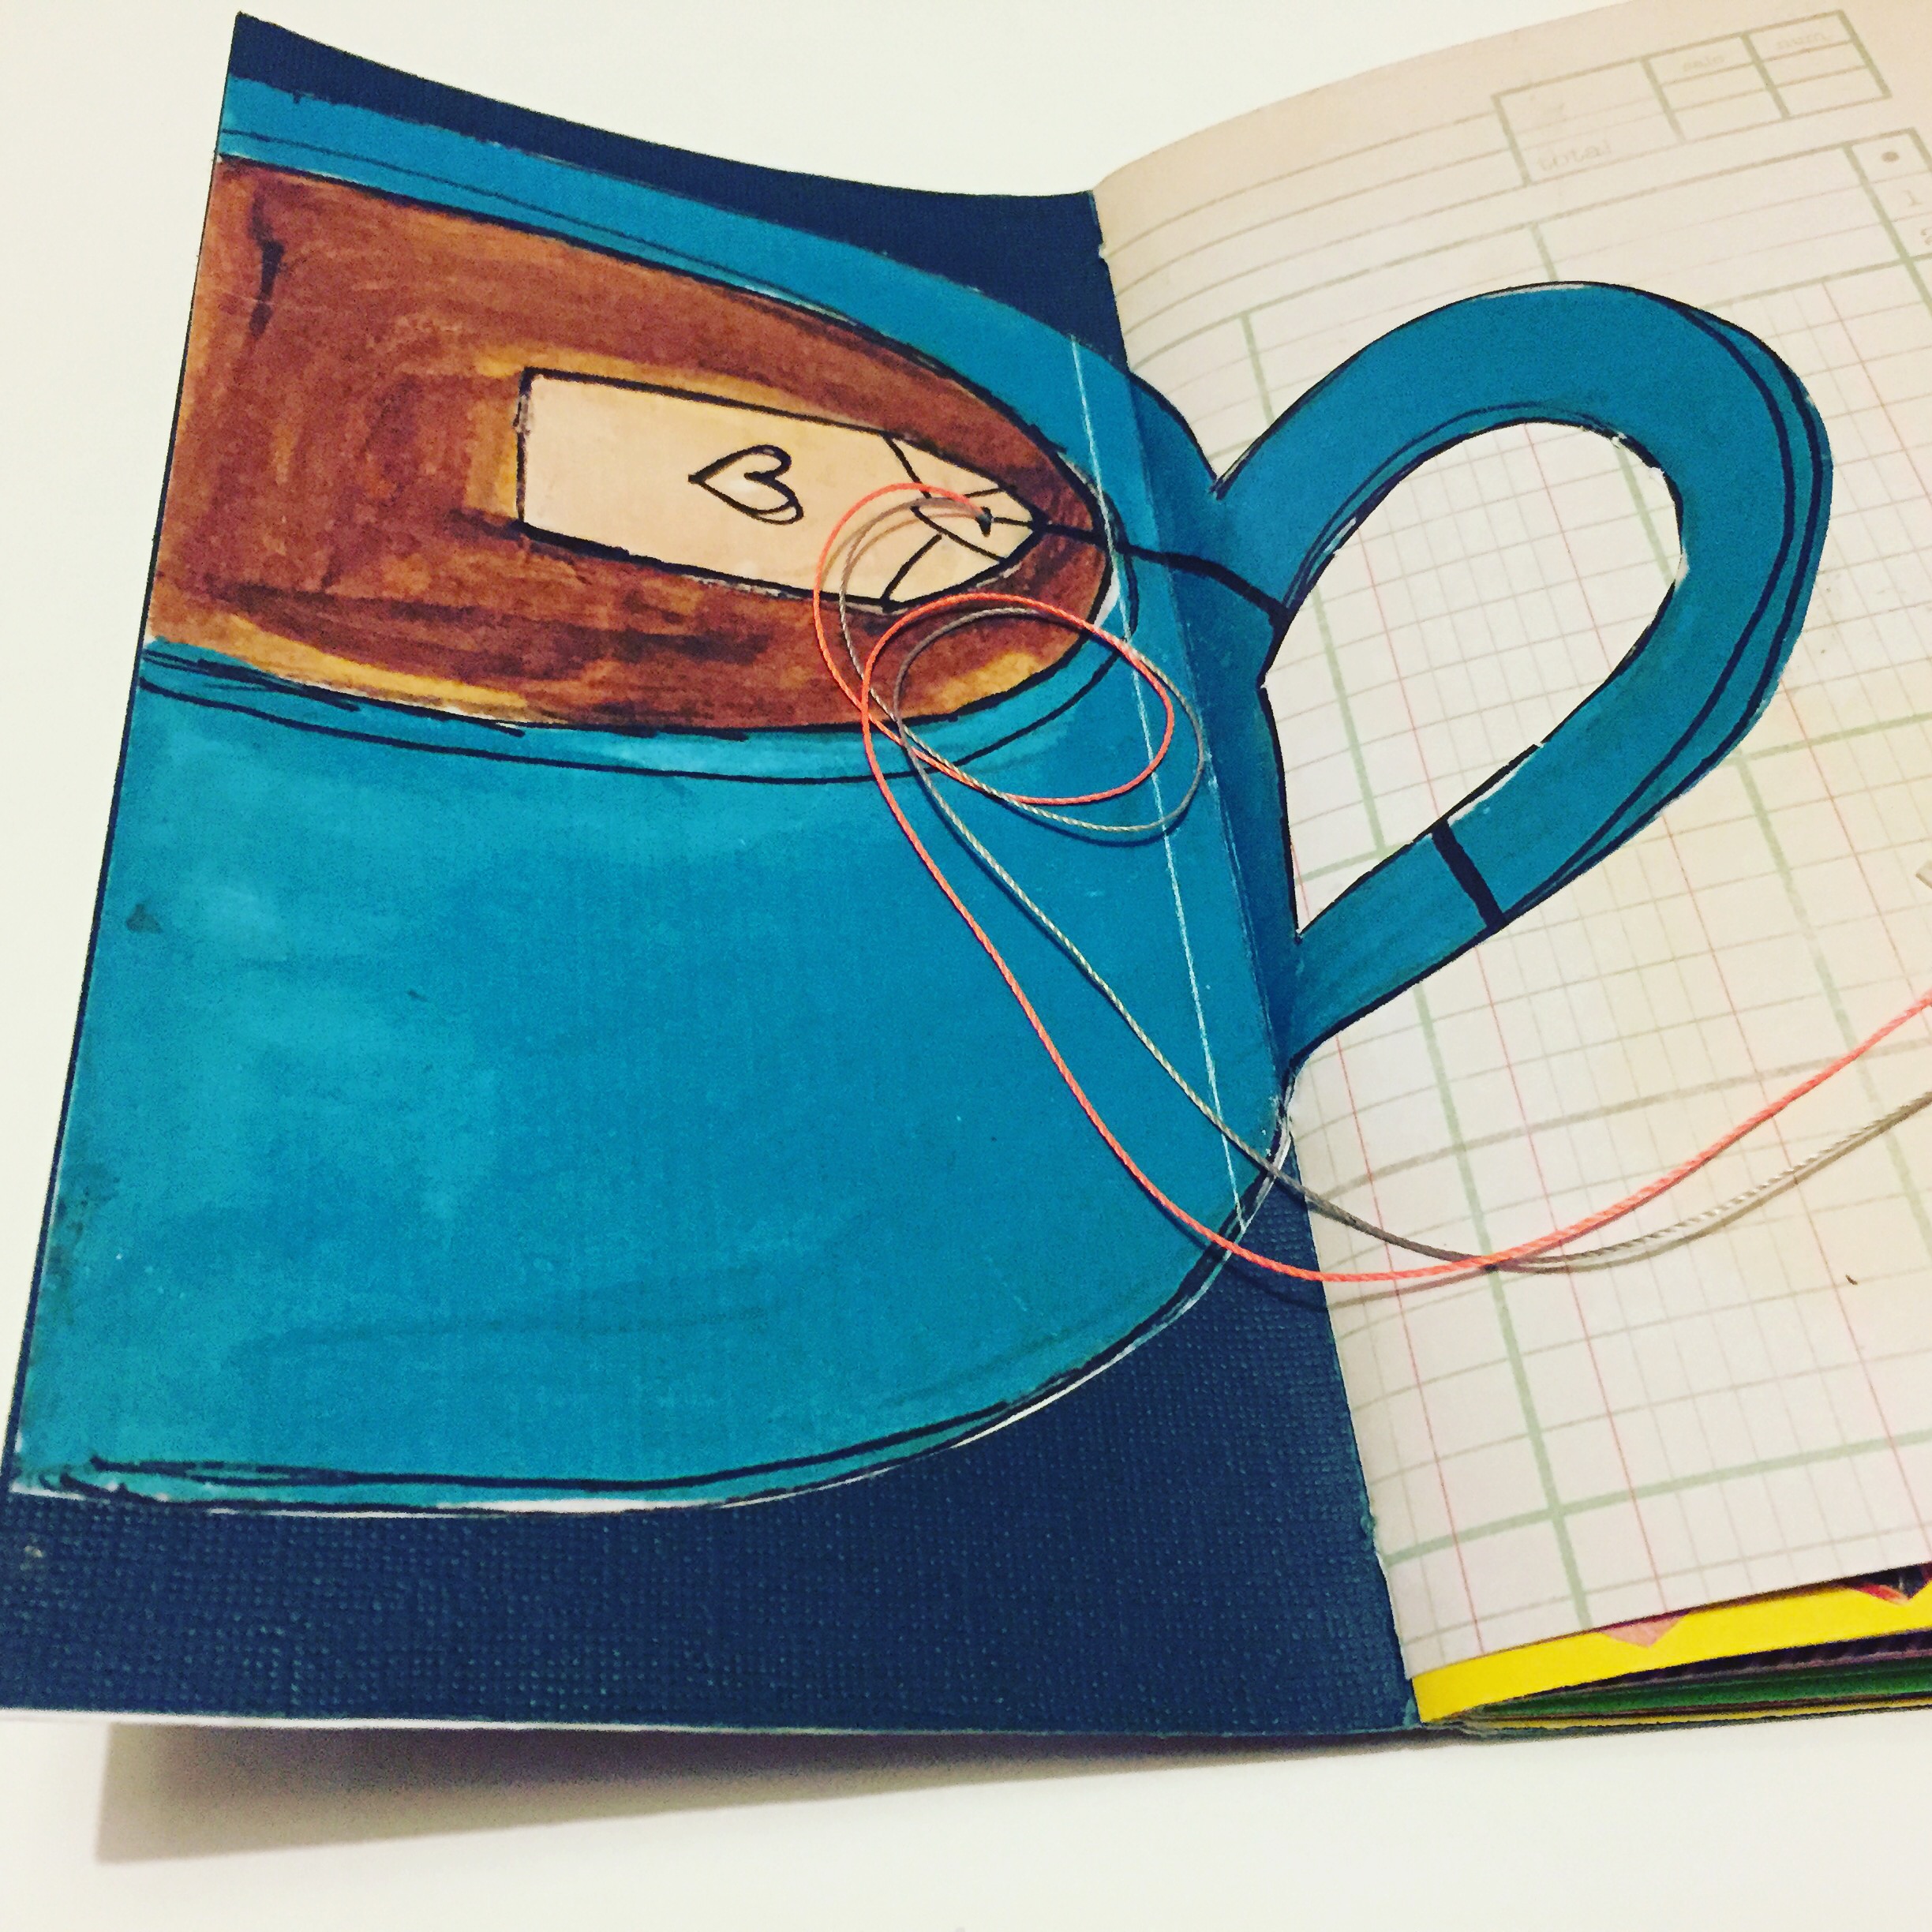
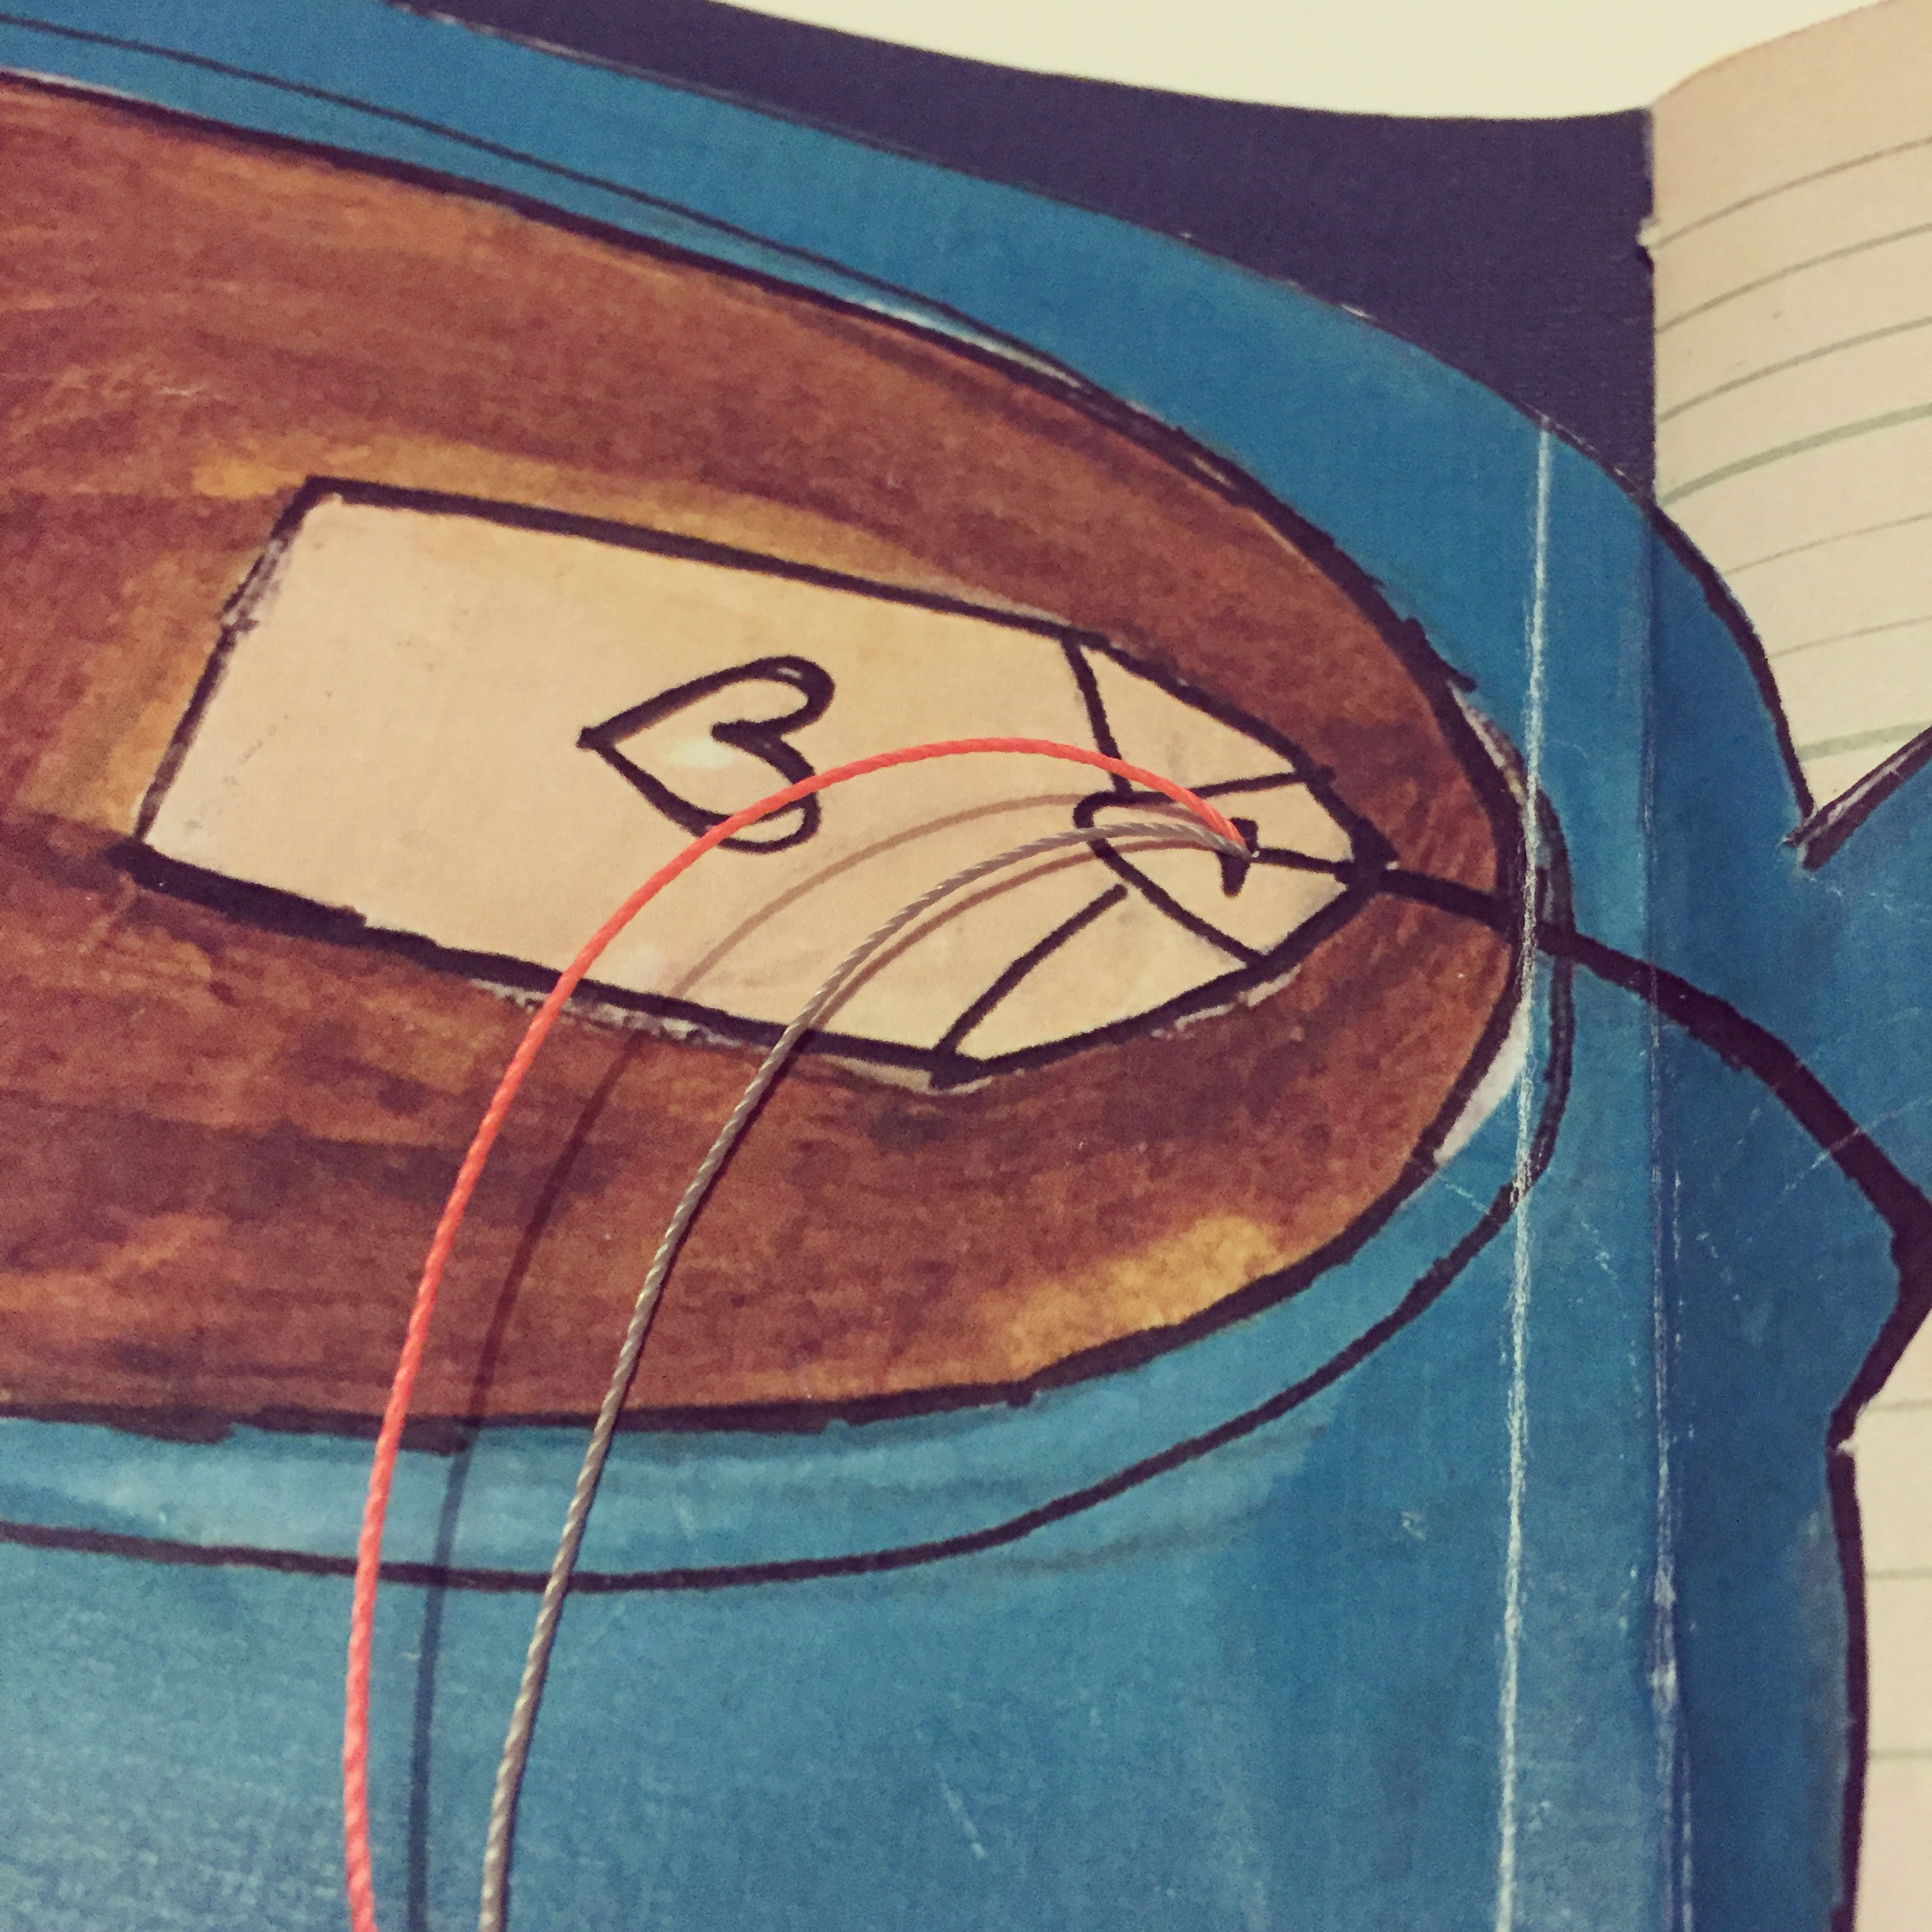
I fell in love with Anna's inviting mug of hot tea as soon as I saw it and it was a given that it would take pride of place at the beginning of the journal. But by the time I had all my craft supplies out for the task I had had a supersonic idea! I decided to create the tag for the teabag, that until now was drawn on but lost when I cut out the cup from the page, and turn it into a bookmark for the journal. In fact I made two.
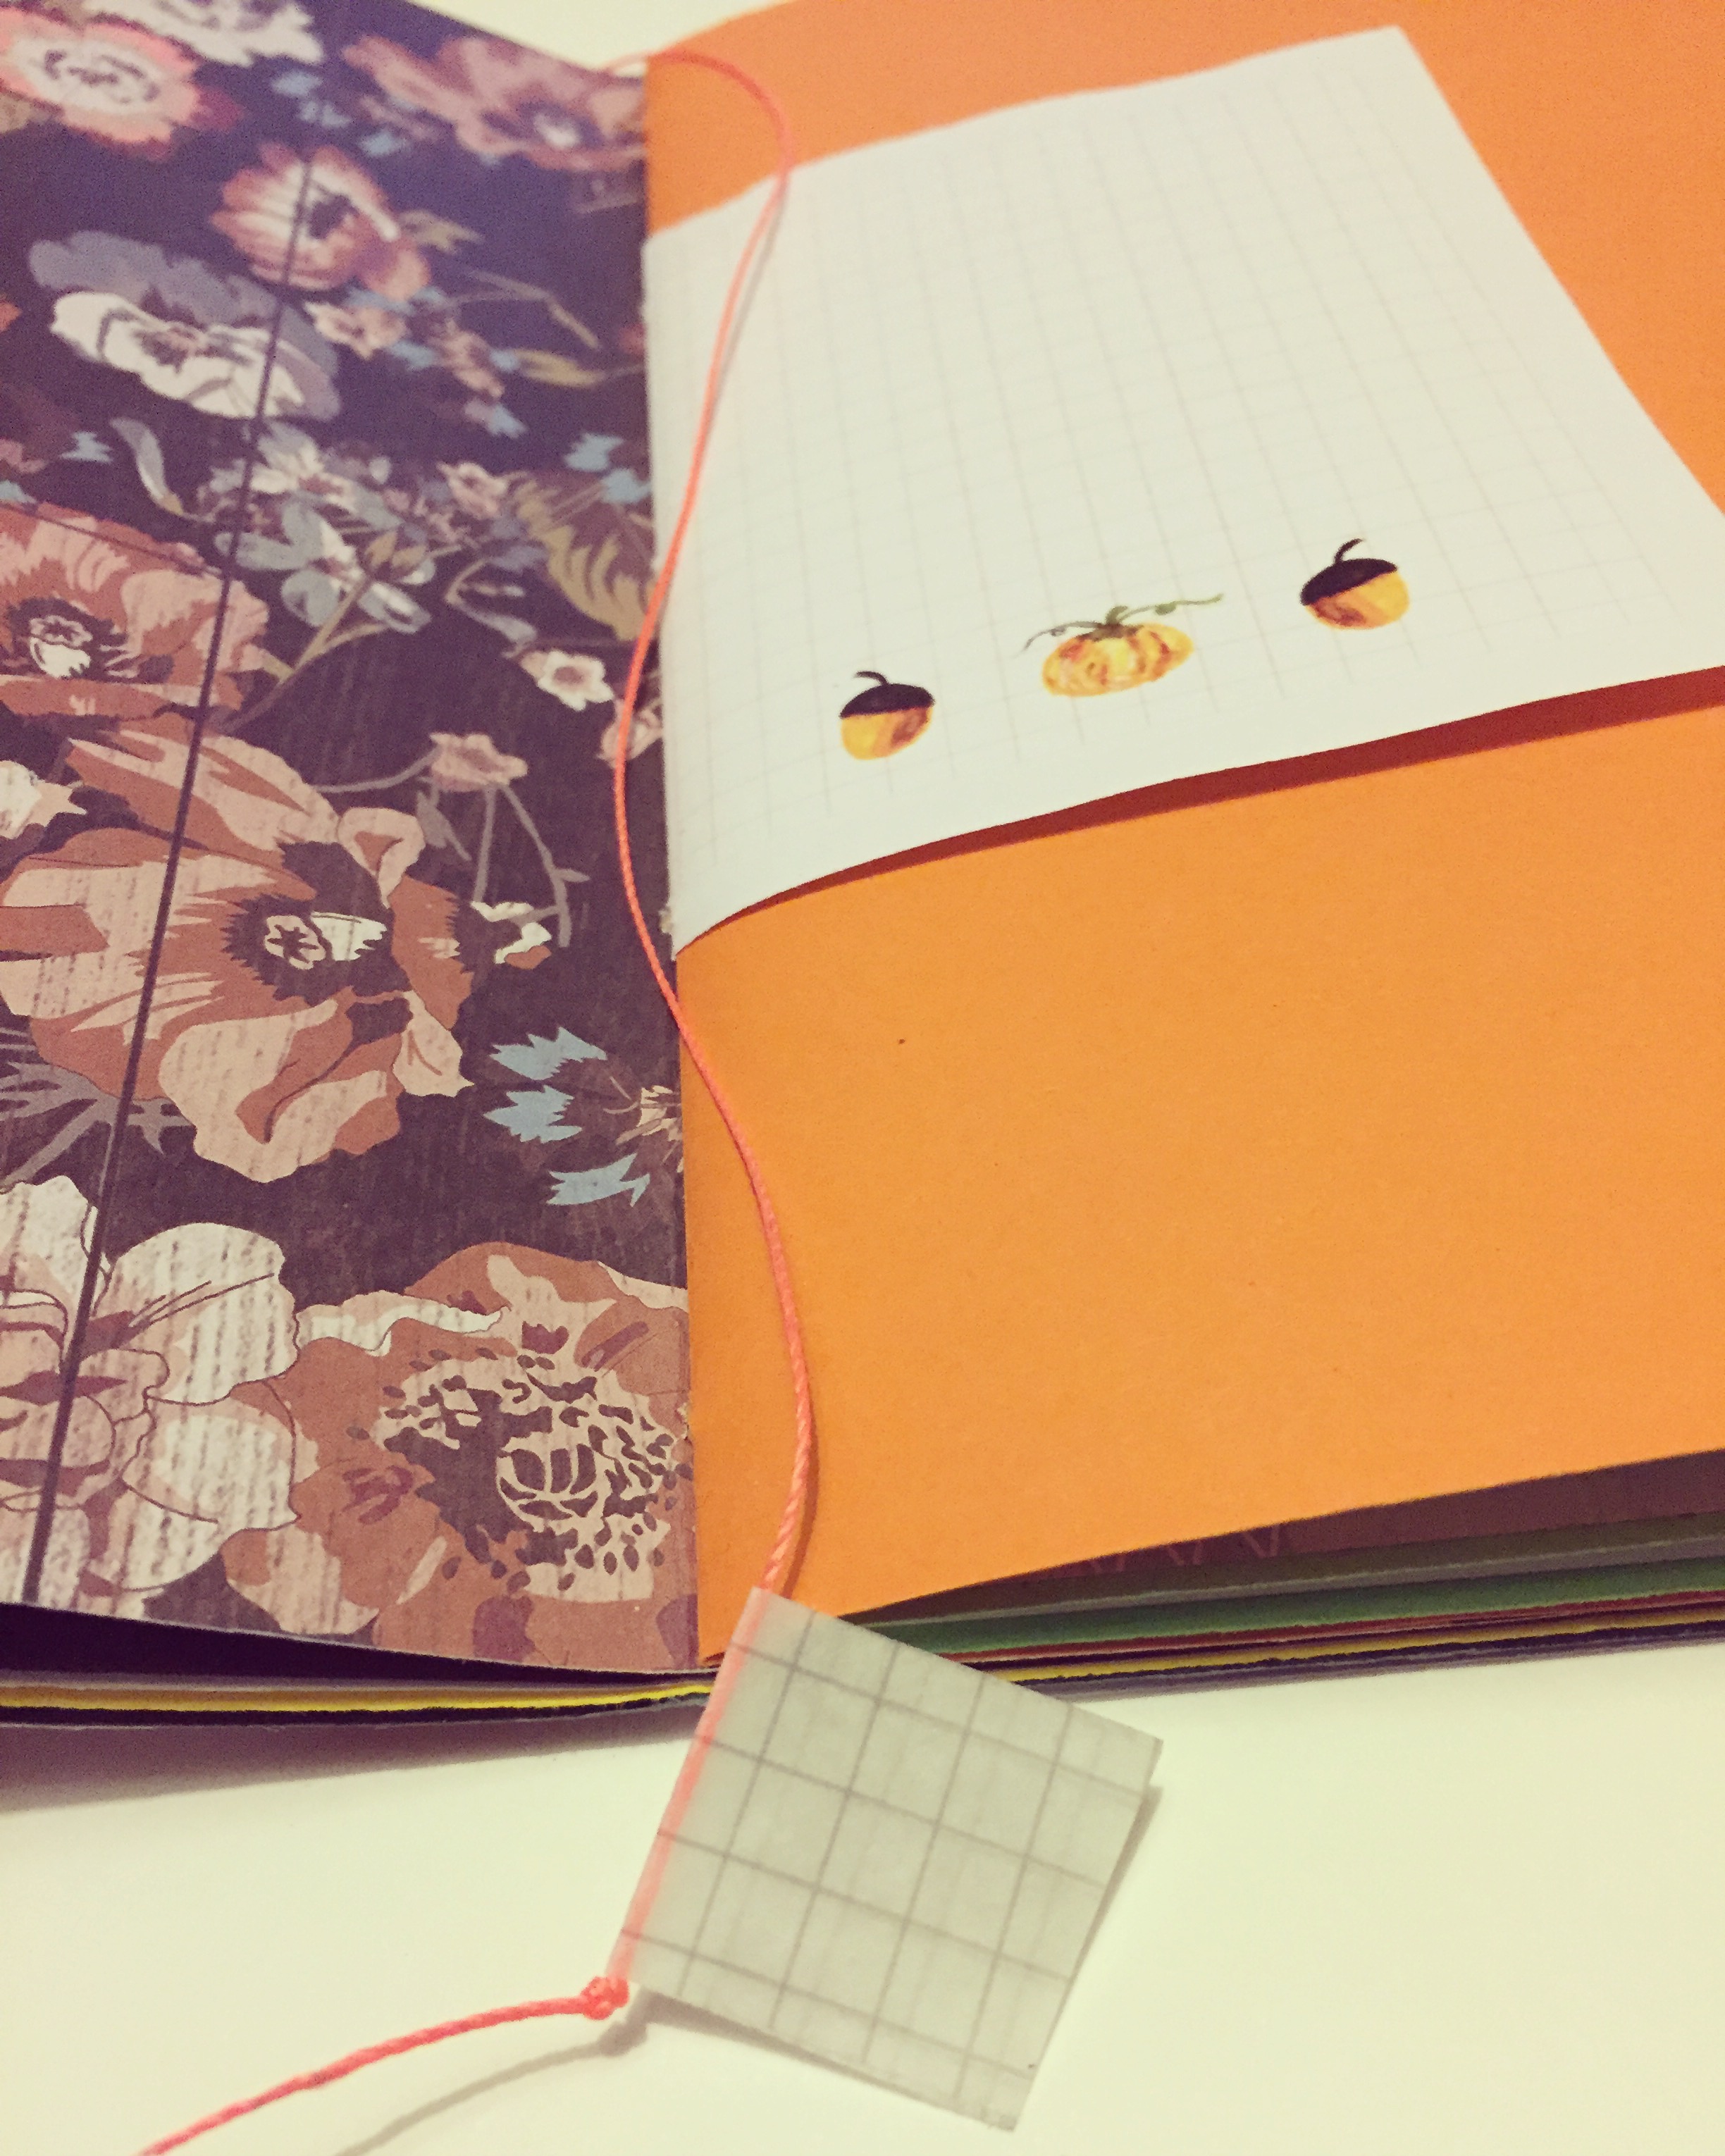
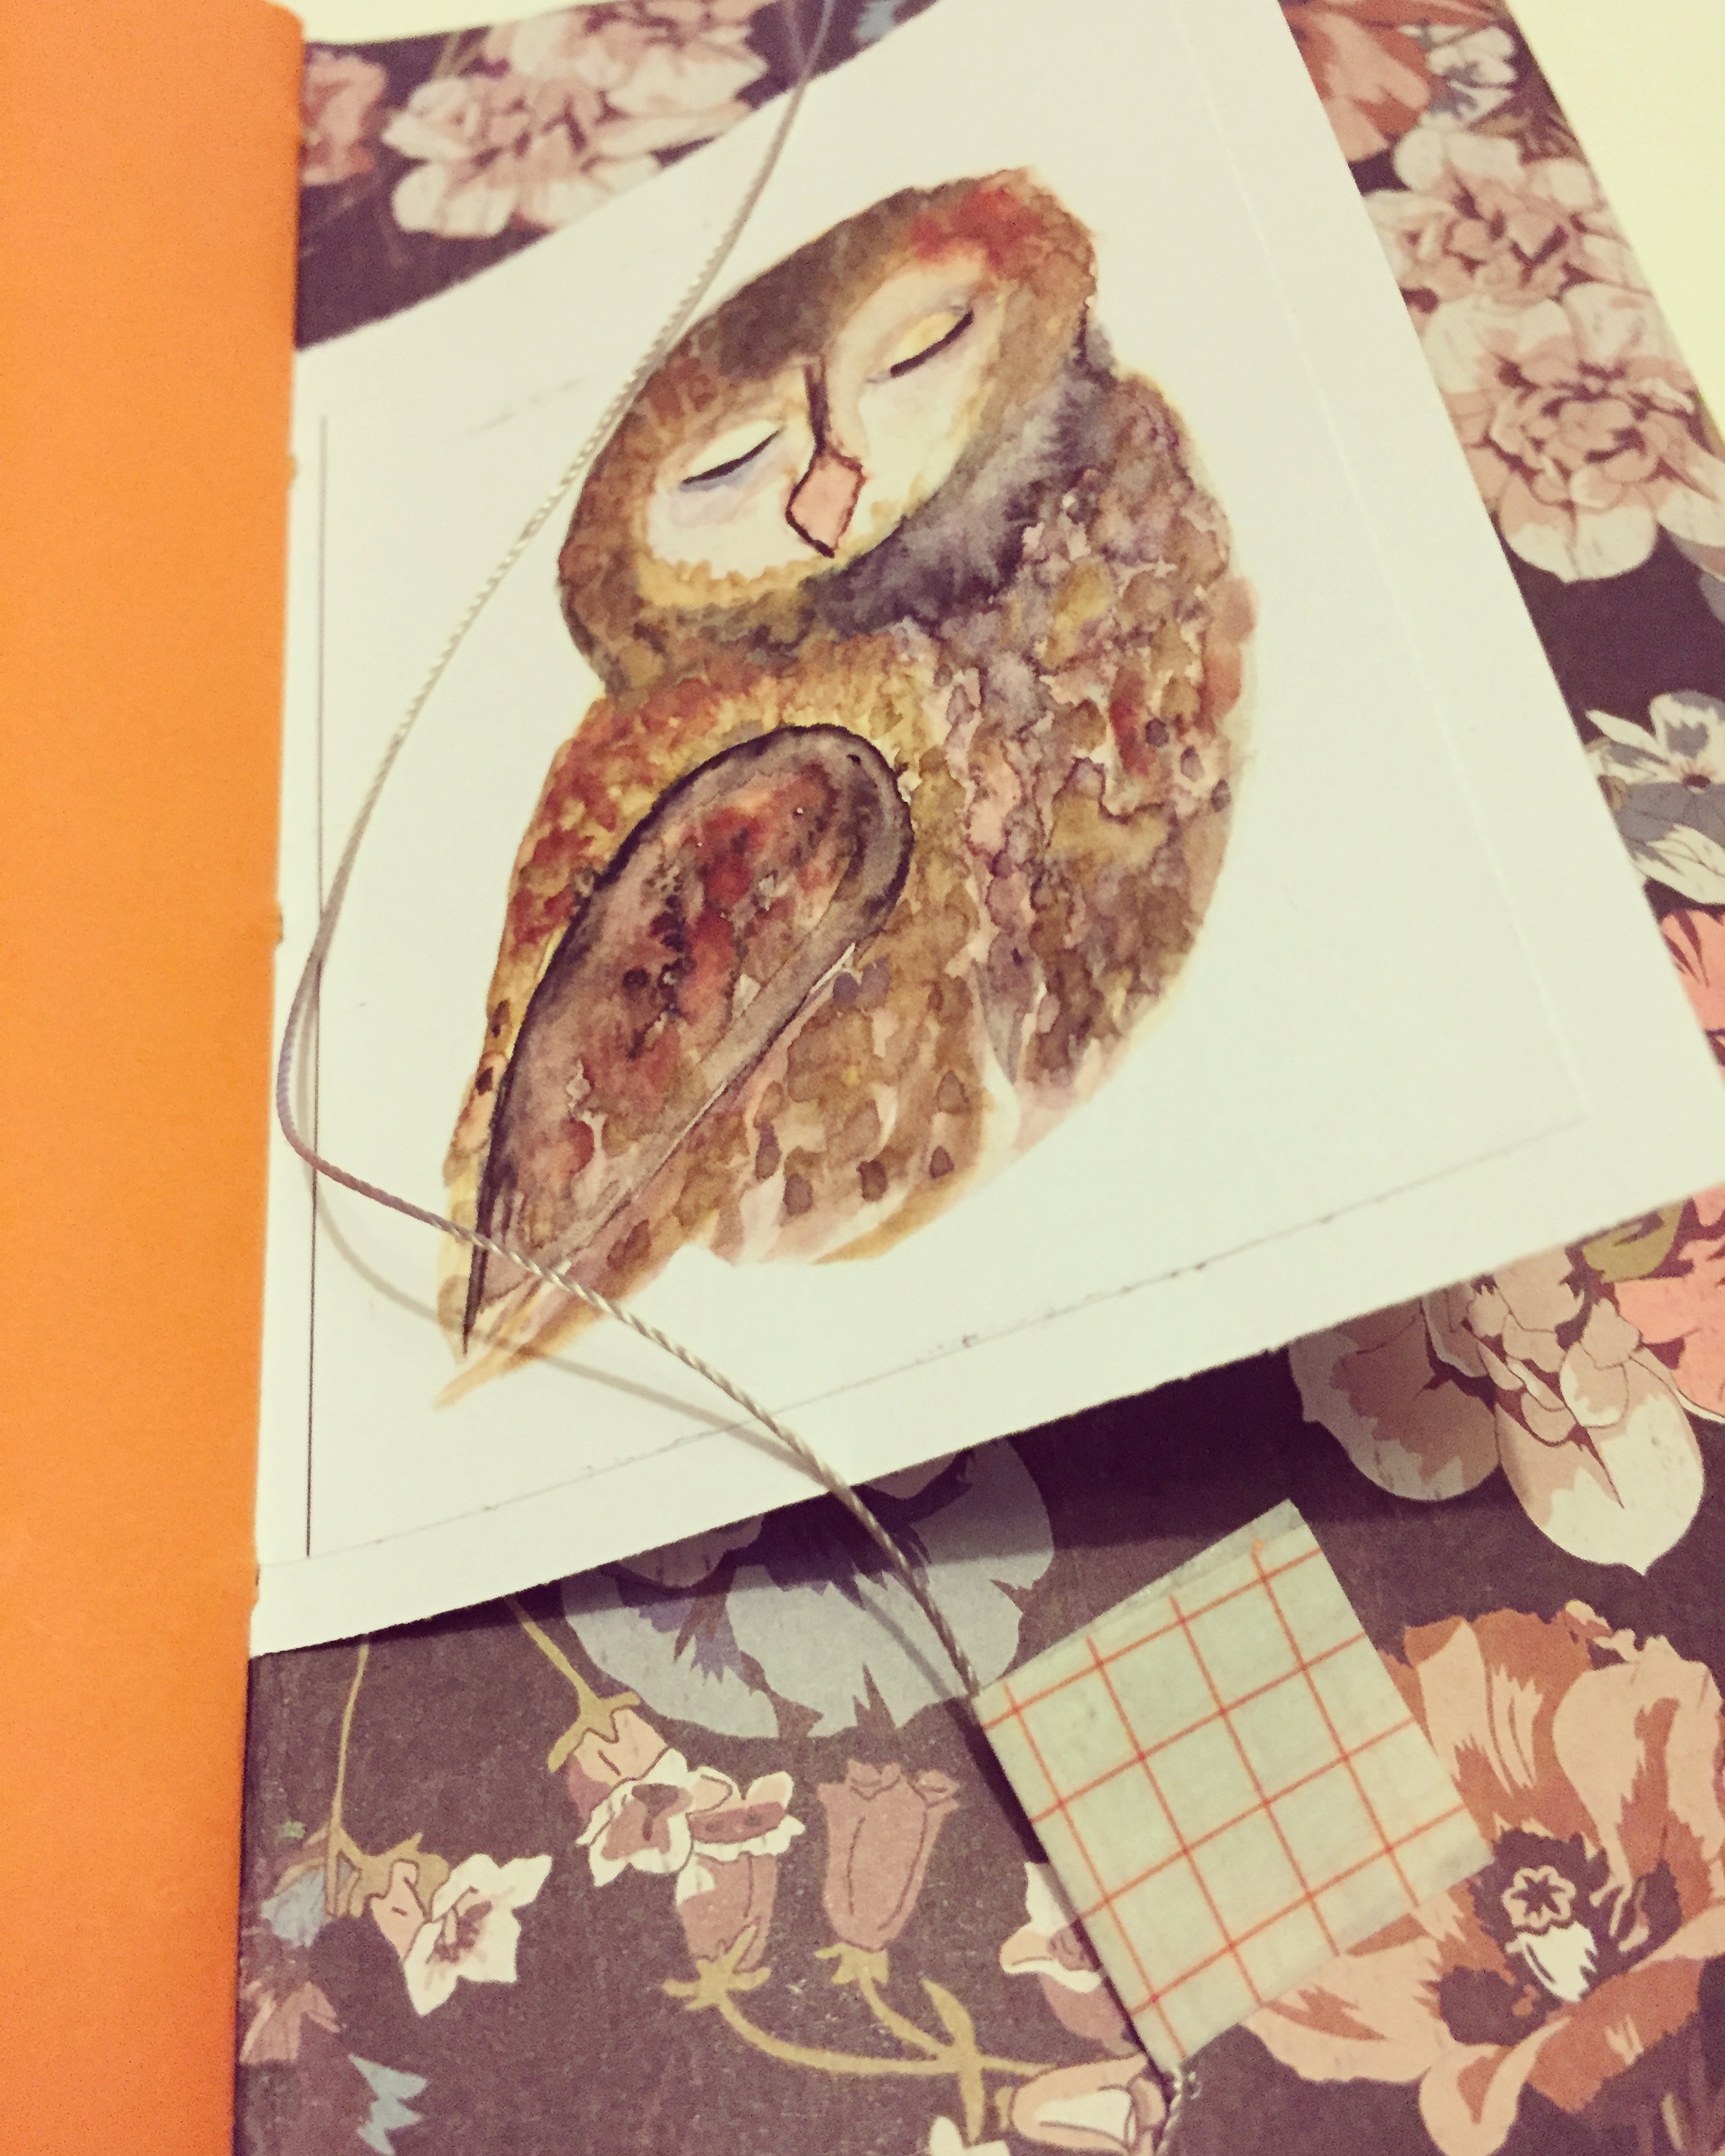
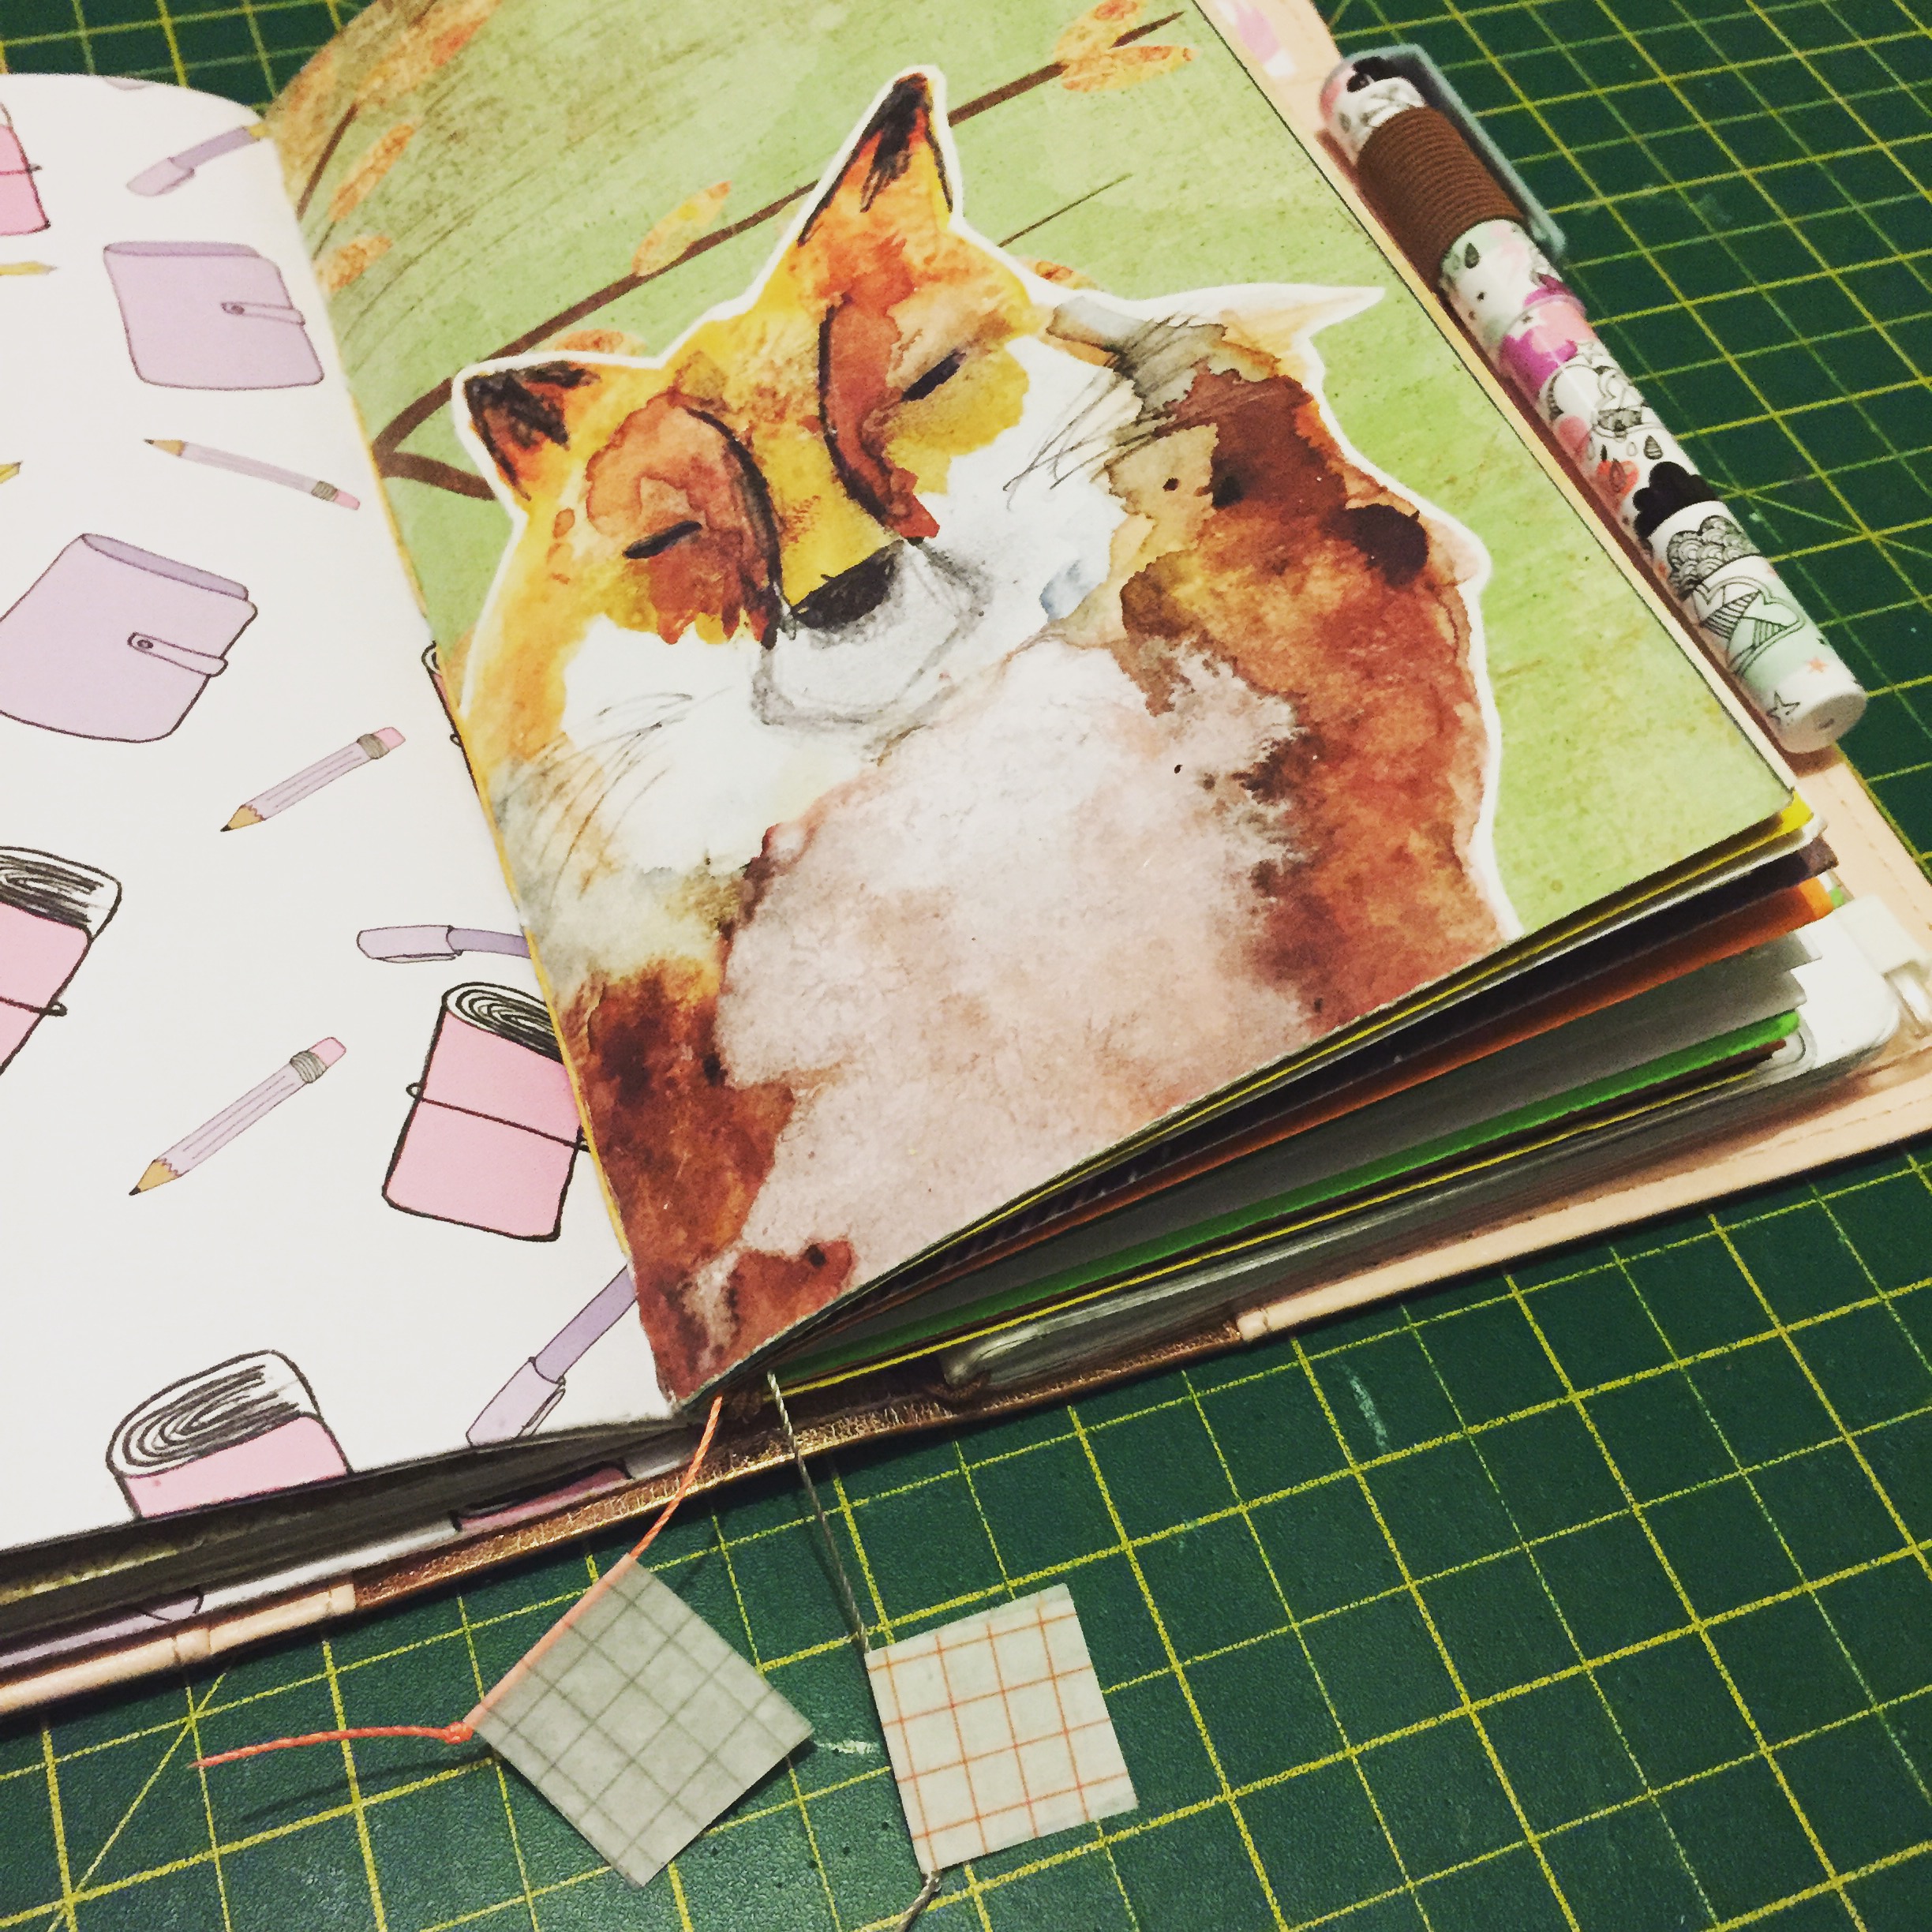

At the end of September I was full of determination to take part in October Daily and journal regularly in a special traveller's notebook insert to celebrate the change in season. Unfortunately I was not able to do the project justice and failed to keep up with writing every day, as October became an extremely busy month for me. One of the reasons for distraction was a wonderful holiday to New York that I took with my fella, the documentation of which has its very own journal that I will be showing you folks at some point soon. However, I did bind together a fun insert and I am excited to show you some of it today. The cover is made from some autumnal scrapbook paper that I have been hanging on to for absolutely ages decorated with Anna's watercolour fox from her September Patreon collection of collage elements that are still available to you should you sign up now - how great is that?!
I fell in love with Anna's inviting mug of hot tea as soon as I saw it and it was a given that it would take pride of place at the beginning of the journal. But by the time I had all my craft supplies out for the task I had had a supersonic idea! I decided to create the tag for the teabag, that until now was drawn on but lost when I cut out the cup from the page, and turn it into a bookmark for the journal. In fact I made two.
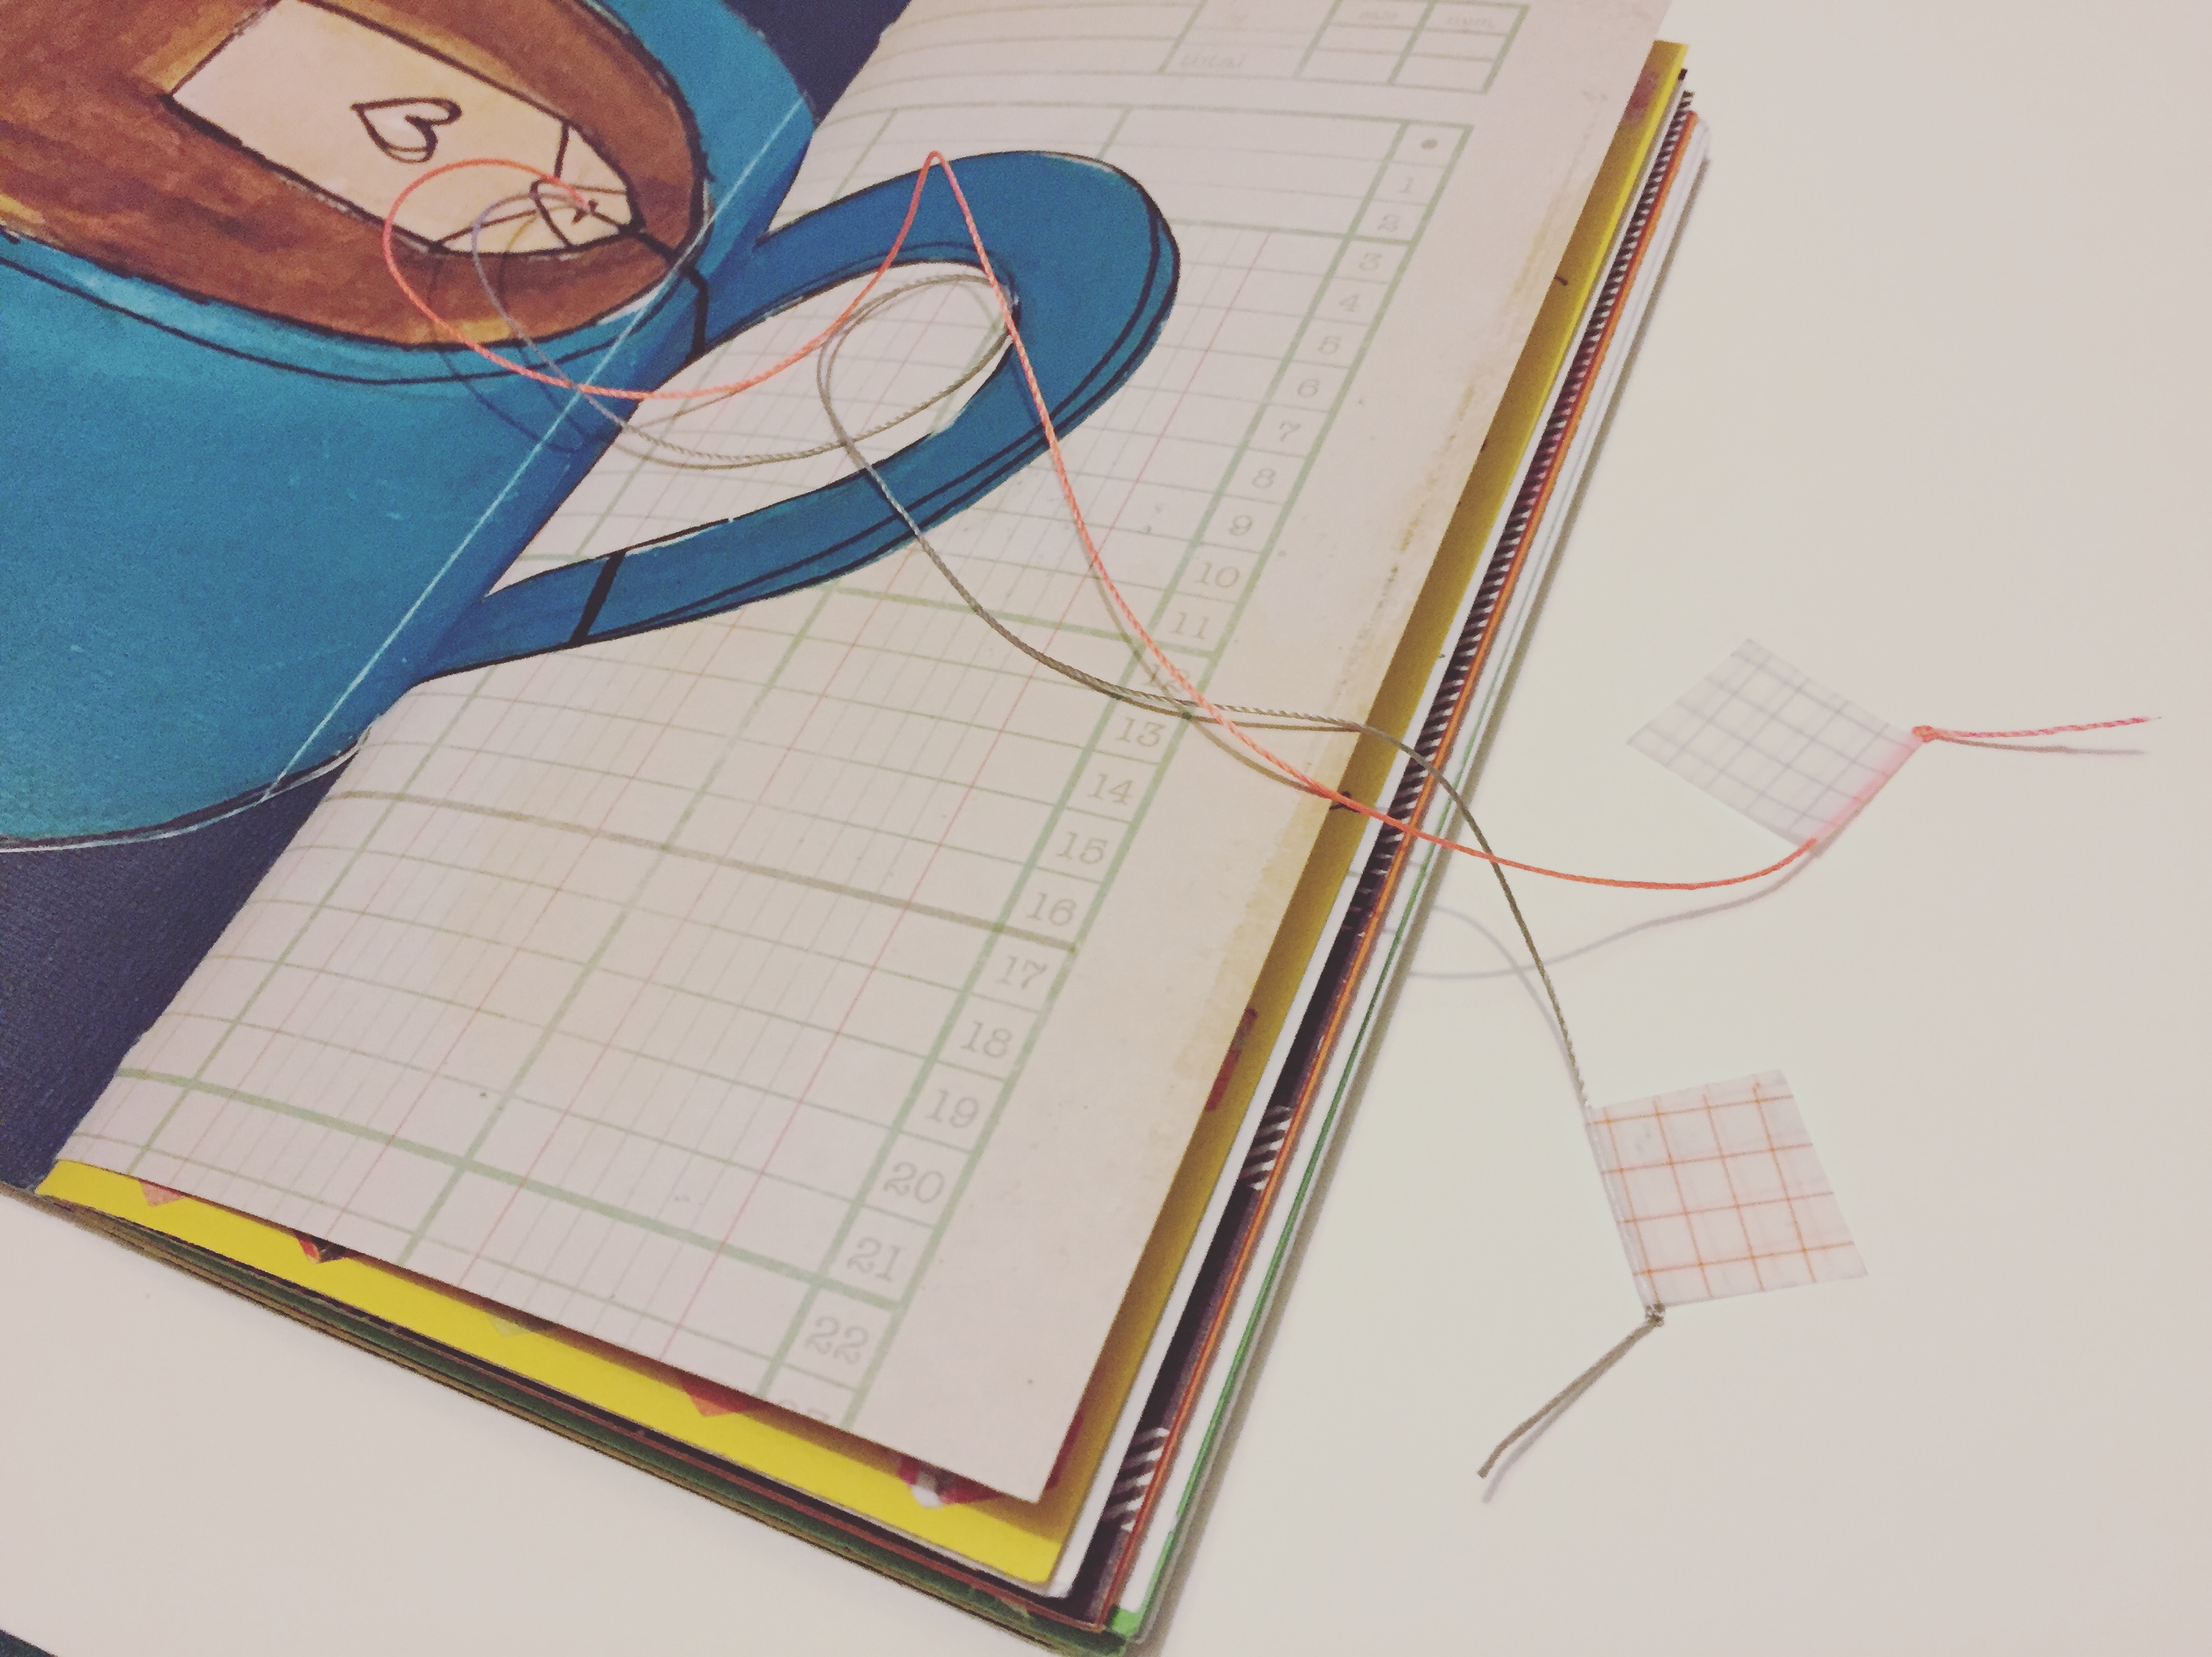
I backed the mug on some lovely blue card stock and used a bookbinding awl to make a precise hole in the teabag drawing. I threaded two different coloured threads through that hole and tied knots to secure them and taped them in place. To hide this I then stuck the cover of the journal in place, causing the image to be on the inside front cover of the insert. At the other ends of the threads I tied a knot and fixed some grid washi tape.
Throughout the journal I have used autumnal papers and colours, including bits and bobs from Anna such as these adorable acorns, pumpkin and watercolour owl journal spots.
Thanks, as ever, for reading. Until next time.
Steph x x x

Saturday, 4 November 2017
Beginning a new Journey

Hi guys! It's been a couple of weeks since my last post and I'm feeling a little rusty! Today I thought I'd catch you all up on my progress with Anna's fantastic Adventure Journaling course. Just a little bit about the course before we get started, for those of you who may not have seen it. Anna takes us through what adventure journaling is and what it can be, quick jaunts out to the park to fabulous holidays away. Anna shares some great tips and tricks from which supplies to pack to how to create beautiful pages documenting the things you have done.
What is adventure journaling to me? Well, because I journal most days, about the day to day goings on in the household I tend to view adventure journaling as something separate. Adventures, for me are any event or occasion that removes me from my everyday routine or where I find my myself in someplace new.

Sometimes, that'll be something big like a family holiday but mostly it's when my partner and I take the day to explore a new town or park or a road trip to visit friends or family. Although they are both adventures, I still view them differently, mini excursions for the latter is perhaps more appropriate as they happen more frequently. I also tend to journal when I am back home, in my cosy little (and messy) office. At the minute I don't have a dedicated adventure journal and these tend to go in my everyday journals.

Synchronicity at it's finest. The day I picked to make a start on the classes I headed to the supermarket to pick up some bits for dinner. I couldn't face doing a 'big shop' so I headed to the little local one. I wandered over to the magazine section, generally speaking there is never much more than a couple of newspapers and the celebrity type magazine which are not my thing. However, that day they had a few copies of Project Calm featuring travel, adventure and storytelling! Snapped that up quick. It is a really lovely magazine, full of all sorts of things, mostly craft related, writing and stunning photography. It is a little on the expensive side but it is definitely worth purchasing a copy if you see one.

This year it is all change in my family for Christmas, my siblings are off to their respective inlaws for the festive period, we are having our roof reroofed (that sounds funny!) and so we are all in different places, usually we all head to my parents for Christmas Day but this year that's not possible. So J and I decided we'd take the opportunity to go away somewhere. With the pets holidays can be a little difficult, not impossible, but logistically it is added stress. We have also spent the last couple of summers working on doing up our house, so realistically over Christmas is the best opportunity for us to go somewhere together. Definitely a cold somewhere, can't be doing Christmas in a hot climate!!

As this will the first holiday away we've had together I wanted to go with something a little more special than my everyday journal. Then came the age old problem for a stationery addict....which notebook should I use? I had a rifle through my stack of unused journals and notebooks, which I'm a tad ashamed to admit is huge. I settled on the one below, which is rather fitting seeing as it is a handmade journal I picked up whilst on adventure earlier this year. J and I, after many years (and I'm talking about 8 years or so!) of driving past and me saying I'd like to go, finally visited the Imperial War Museum North on a very wet and miserable day! Ever since I was a wee thing I've always bought myself a pencil or pen from the gift shop. It is something that started when my parents would take us on outings and we'd always visit the gift shops after. I was allowed one small item, which would always, always be a pencil or a pen! I've hoarded these pencils..haha and I now have quite a collection in my pen pots.

I'll be back to update you on my progress soon. But for now, thankyou for stopping by and getting to the end of the post! One of these days I will learn the art of being concise..haha. Don't forget to check out Anna's course if you haven't already!!
You can also find me on Instagram and over on my own blog here.
Saturday, 21 October 2017
Sizzix Creative Journal / Travelers Notebook Journal Making Goodies
I was very kindly sent a box of goodies from Sizzix to share with you all and to make and share as a result. The itema you see are available to purchase from: https://www.sizzix.co.uk/ and https://www.hochanda.com/or https://www.sizzix.com/ if you are in the US as well as other scrapbook companies.
PLEASE NOTE: I was given this / these product(s) in exchange for my honest review and opinion, the fact that I was given these does not alter my opinion in anyway. This review is my own personal opionion on the product / company, given in good faith and has not be sponsored or endorsed. None of the links are affiliate links. Unless otherwise stated, all photography is my own.
PLEASE NOTE: I was given this / these product(s) in exchange for my honest review and opinion, the fact that I was given these does not alter my opinion in anyway. This review is my own personal opionion on the product / company, given in good faith and has not be sponsored or endorsed. None of the links are affiliate links. Unless otherwise stated, all photography is my own.
Friday, 20 October 2017
New Travelers Notebooks & Inserts
I was very kindly sent two travelers notebooks from Stitch & Weave to share with you. I also purchased a couple of inserts so I thought I would combine it all for a TN haul for you! The two lovely TN's were from Jeni of: https://www.etsy.com/shop/stitchnweavestore
Inserts were purchased from: https://www.etsy.com/uk/shop/UltSuccessPlanner
PLEASE NOTE: I was given this / these product(s) in exchange for my honest review and opinion, the fact that I was given these does not alter my opinion in anyway. This review is my own personal opionion on the product / company, given in good faith and has not be sponsored or endorsed. None of the links are affiliate links. Unless otherwise stated, all photography is my own. The same also applies to the items I purchased with my own money.
Tuesday, 10 October 2017
October Daily 2017 Week One Flip Through
I'm doing October daily this year. Here is my week one flip through.
Tuesday, 20 June 2017
My thoughts on doing a December Daily (in a travelers notebook)
A vlog from me on my thoughts regarding doing a December Daily memory keeping project. Is it worth it, did I enjoy it etc.
Also my thoughts on doing it in a travelers notebook!
Flip through coming next week!
Also my thoughts on doing it in a travelers notebook!
Flip through coming next week!
Tuesday, 13 June 2017
New journal and travelers notebook!
I very recently went on an Etsy hunt in order to look for a present for my lovely friend Daisy of My Green Cow. She loves all things planner, stationery and journal like I do and also the colour yellow. I came accross a seller called Dixie Dorie and saw the perfect thing. When it came I had this horrible inner battle...I wanted to keep it because it was so gorgeous. Of course I gave it to Daisy but I couldn't get it out of my mind!
I loved the spine on it and I loved that it had 6 elastics. I liked the colour but it was the construction that kept on calling to me. It's kinda weird because it was a 'personal' size and I have always used the 'standard' size.
So one day whilst browsing on instagram the seller posted a photo of the most gorgeous fabric that totally spoke to my soul. I mean it is just so me, so much like the little characters that I draw that I had to ask if she could make me a custom order in my favourite colour...teal with that fabric. She said yes, so I sold a couple of planners in the facebook planner de-stash group that were no longer giving me joy (I was awake when I read the Marie Kondo book lol!) in order to be able to fund it.

See what I mean! The fabric is amazing. I posted a photo on instagram this morning of some doodles I have that I will be sharing on Patreon in the form of collage and design sheets as well as a tutorial and whilst not 100% the same you can see similarities in the style and why this fabric would appeal to me. Here is the photo of my doodles:

Check out my Patreon page: www.patreon.com/mrsbrimbles
Well it came and it did not disappoint. I thought I would share an unboxing with you so that you can see what it is like. The colour is amazing. I just love anything on the mint to teal spectrum of greeny blues ha ha! It makes me happy.

The seller also sent me a couple of other items too which was incredibly generous and very kind indeed. I absolutely love them! In true Anna style I have been busy making inserts and I will probably do another post when I am all set up and ready to go!

Whilst we talk about inserts, I was also sent a couple of inserts to share and review with you so I have included those in my haul too. Check out the video to see everything:
The shops mentioned are as follows:
Travelers Notebooks and Bow Charms: https://www.etsy.com/uk/shop/plannercandeebydixie
Dashboard: https://www.etsy.com/uk/shop/GeraldineJayneCrafts
Inserts: https://www.etsy.com/uk/shop/paperpenandplan
As I said I will be sharing my set up on these soon so be sure to come back to check those out!
PLEASE NOTE: I was given this / these product(s) in exchange for my honest review and opinion, the fact that I was given these does not alter my opinion in anyway. This review is my own personal opionion on the product / company, given in good faith and has not be sponsored or endorsed. None of the links are affiliate links. Unless otherwise stated, all photography is my own.
 |
| Photo by Daisy: https://www.instagram.com/mygreencow/ |
So one day whilst browsing on instagram the seller posted a photo of the most gorgeous fabric that totally spoke to my soul. I mean it is just so me, so much like the little characters that I draw that I had to ask if she could make me a custom order in my favourite colour...teal with that fabric. She said yes, so I sold a couple of planners in the facebook planner de-stash group that were no longer giving me joy (I was awake when I read the Marie Kondo book lol!) in order to be able to fund it.

See what I mean! The fabric is amazing. I posted a photo on instagram this morning of some doodles I have that I will be sharing on Patreon in the form of collage and design sheets as well as a tutorial and whilst not 100% the same you can see similarities in the style and why this fabric would appeal to me. Here is the photo of my doodles:

Check out my Patreon page: www.patreon.com/mrsbrimbles
Well it came and it did not disappoint. I thought I would share an unboxing with you so that you can see what it is like. The colour is amazing. I just love anything on the mint to teal spectrum of greeny blues ha ha! It makes me happy.

The seller also sent me a couple of other items too which was incredibly generous and very kind indeed. I absolutely love them! In true Anna style I have been busy making inserts and I will probably do another post when I am all set up and ready to go!

Whilst we talk about inserts, I was also sent a couple of inserts to share and review with you so I have included those in my haul too. Check out the video to see everything:
The shops mentioned are as follows:
Travelers Notebooks and Bow Charms: https://www.etsy.com/uk/shop/plannercandeebydixie
Dashboard: https://www.etsy.com/uk/shop/GeraldineJayneCrafts
Inserts: https://www.etsy.com/uk/shop/paperpenandplan
As I said I will be sharing my set up on these soon so be sure to come back to check those out!
PLEASE NOTE: I was given this / these product(s) in exchange for my honest review and opinion, the fact that I was given these does not alter my opinion in anyway. This review is my own personal opionion on the product / company, given in good faith and has not be sponsored or endorsed. None of the links are affiliate links. Unless otherwise stated, all photography is my own.
Sunday, 12 March 2017
Travelers Notebook Journal & Vision Board


This month's box went perfectly with a new Travelers notebook I bought! So it seemed only fitting to make the various inserts for it with things from the box. Firstly, I really wanted to make a folder to store stickers, receipts, etc. After cutting it to size and sticking down my chosen ephemera & washi, I covered in it sticky back plastic. I find it's not as thick as acetate and so there is less bulk. Not to mention I love the feel of it.


Next, I needed a new vision board. So using my chosen card, I cut it to size and stuck on cork board. Now it's all ready for me to start adding everything that inspires me and things I'm believing for.


Here's an example of another vision board I made to give you an idea of how it looks when filled...

I really hope this has inspired you to get creative with your own box! If you would like to know how to subscribe, click HERE! Thanks so much for stopping by!

Monday, 13 February 2017
Travelers Notebook Page Marker

 The eye candy of colours and art that greeted me in February's Brimbles box was overwhelming. The papers screamed to be used as notebook covers. Because they are double sided, it look double cute.
As I made one for my regular size travelers notebook, the thought came to me to use one of the cute pieces of ephemera and the sequins, and make a tiny little bookmark charm. Sewing around it in bright pink thread gave it an added dimension.


Taking another piece of ephemera, I ran it through the laminator, and hot glued it onto a big yellow paperclip which was in keeping with the colour scheme. A flower at the back hid the messy glue!


I'm currently setting up a pocket size planner to keep on track with my traveling/happy mail. The colour scheme and artwork, especially the envelopes, went really well with the planner, so I decided to make a set of dividers and a shaker dashboard. Instead of the sequins, this time I thought it would be fun to back the stickers with paper and place them inside.


I decided to place the paperclip and some of the stickers, and the washi on the inside cover of the planner.

Subscribe to:
Posts (Atom)