Showing posts with label scrapbook. Show all posts

Sunday, 29 July 2018

Wave-tastic Vibes


Well no one can say that Summer isn't here, with all this...err glorious? sunshine! I'm definitely not a hot weather girl so I'm properly hermitting away in the house, with the curtains drawn and windows thrown open. I will also admit to sitting in front of the fan and producing a robot voice, on more than one occasion....ways to fill the hours, eh?

My creativity has taken a bit of a hiatus, since the construction of the cabin commenced and I'm so glad to have finally moved the motherlode of craft supplies in. I still need to insulate the roof so at the minute it is doubling up as sauna. Rather suits one of Anna's themes for this month's Patreon collage sheets, minus the beach and the sea...near enough!


(Excuse the half dead lily.....it is a victim of the Craft Cabin Sauna!)

I was itching to get creating when Anna sent over this months collage sheets, although to be fair that is true for most months, but I have a real tie to the seaside so I was extra eager! There is always such a variety of artwork and differing styles in Anna's content, something for everyone, but the beach themed sheets were calling me. 

As soon as I saw the girls and ice creams I knew exactly where I was headed with them. I have (well now did have) a framed photo collage above our bed that I made back many moons ago of J and I's first holiday away together as a couple. We stayed in my cousin's holiday house up in Thornaby. With Redcar beach about a 15 minute drive away we spent much of the holiday at the beach, chilling in the day and misty walks in the evening. The photograph is of Redcar beach, facing towards the town of Redcar, if you face the opposite direction you look at a Redcar Steel Plant. Quite a juxtaposition.

I decided since it is beginning to look tatty I would repurpose some of the photos. I still have the negatives so I can always have them reprinted if I miss them....haha! 


I began by pulling Anna's artwork into the Silhouette Studio and set about resizing them so they would be roughly in the proportions I was after. A bit of grumbling at my machine and an emergency ink cartridge change and ta dah!! Ephemera appeared!

I also cut out the journal tags Anna added in this months sheets. I'm so happy she included them as I do love to layer them throughout my journaling but they also work as fantastic prompts for layouts. When I'm stuck for inspiration I'll flip through my phrase ephemera and usually something will jump out at me. They can really change the direction you thought you were going in!


I try to keep my ephemera and bits and bobs I'm looking to scrap or journal with in a pot next to me, as far too often they end up mixed with the offcuts and scraps headed for the bin. Cue frustrated searching and much muttering. I clearly didn't follow my own method below...and ended up with a pile of rubbish and ephemera. 

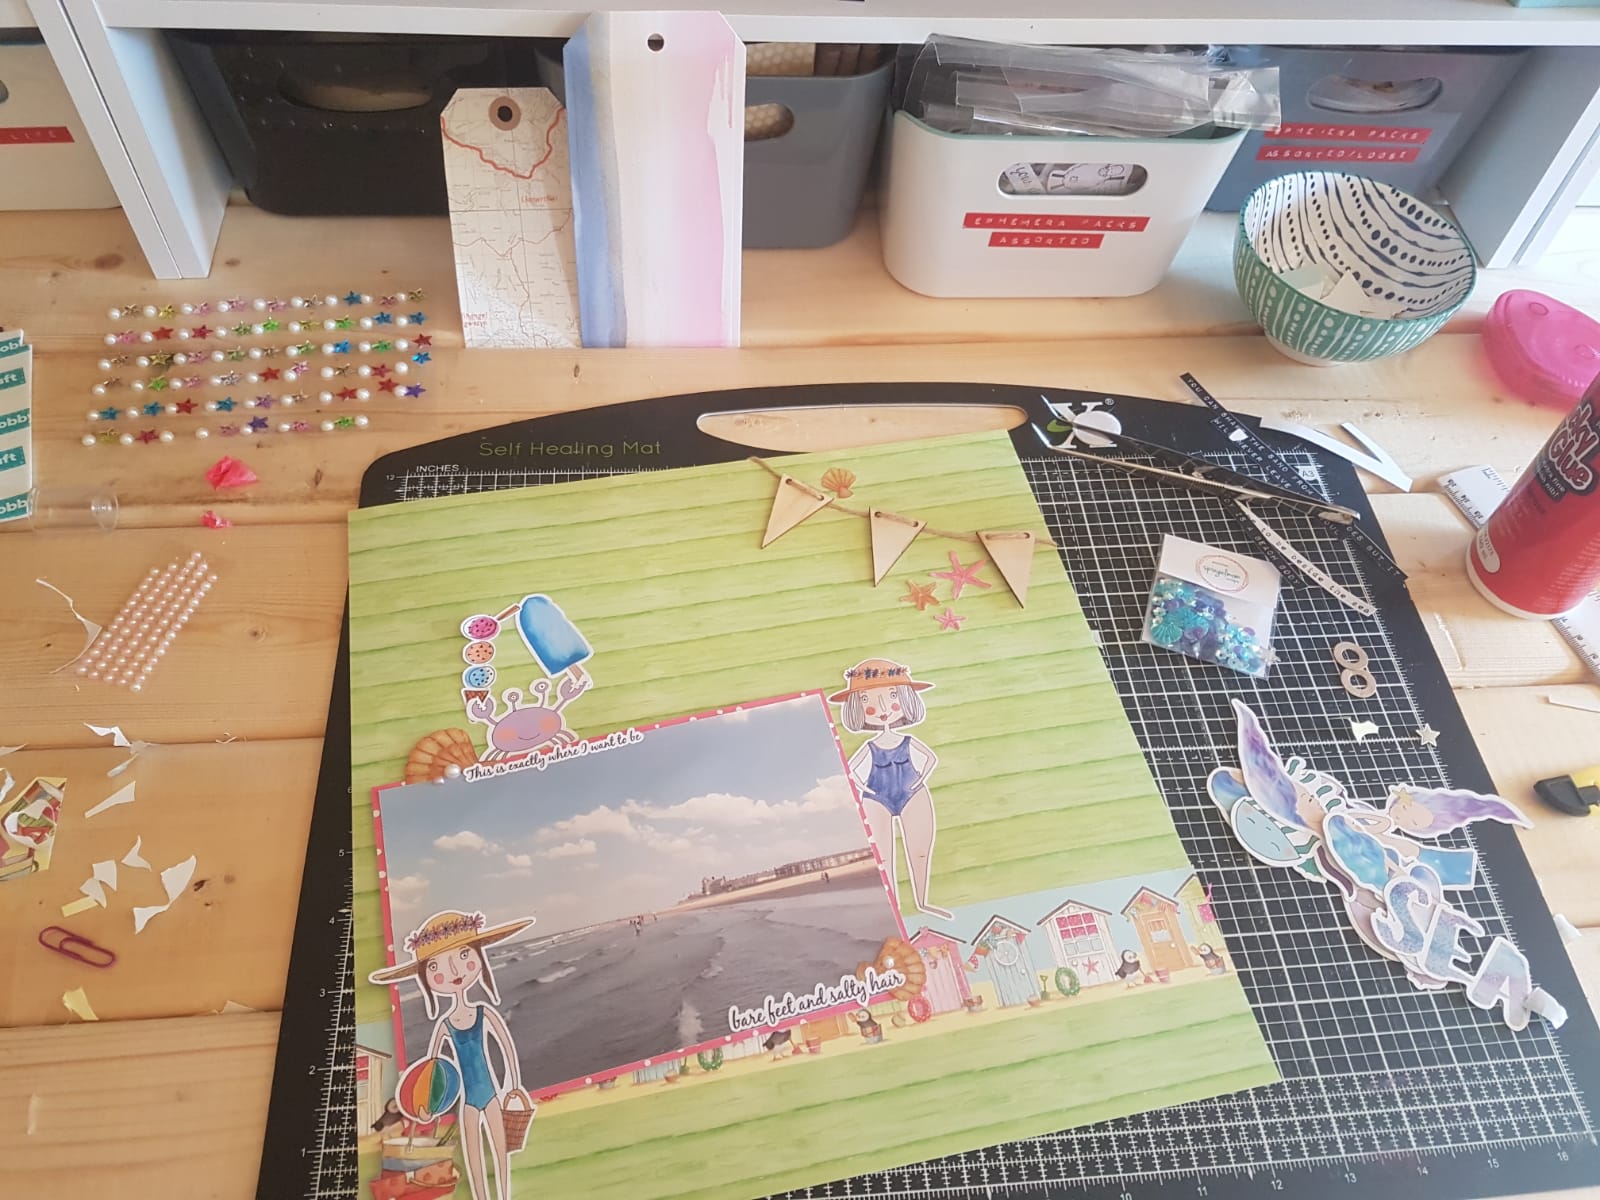
I pulled out my latest 12x12 paper acquisition, the Beach Life Collection and saw how perfect Anna's artwork looked alongside them!


I spent some time pulling out other bits that fitted with the layout I was going for. As it has been such a long time since I last sat down to scrap a 12x12 layout it felt a little daunting. I felt like I didn't have enough things, so there was a lot of rejected items (which I've still actually resort and put away ha!). I also wanted to include some of the buckets, starfish and clams from the other papers, so took some time fussy cutting a few out to dot around the page.

I cut a strip of the beach huts from one of the papers in the pack and placed it towards the bottom of the page. I took this as my line from which to build. I backed my photo on yet another paper from the collection. I wanted something bright to contrast with the green woodgrain effect as without the backing the photo felt a little dull and lost. 


I sat moving the pieces around the page trying to find a natural fit. It is quite different working on a much larger scale again, kind of awkward. When I was happy with the visual I took a quick snapshot on my phone, so that once I started moving pieces off to stick things down I wouldn't forget where I put them. 


To further pull the photo into focus and add some depth I stuck it down on foam tabs. This, however meant my original plan had to be altered slightly to accommodate the additional height. Both the bucket and the girl's legs needed lifting, so I cut small slithers of foam and popped them up to the same height as the photo.  


I LOVE how this little guy looks, he is from Anna's mermaid ephemera pack from the Mermaid Waves collection back in May last year I think? I knew he would be perfect so out he came. I made two small snips into his claws so I could slip the ice cream and ice lolly pieces in, giving the illusion that he is holding them..or running off with them I'm not sure.


The title is a bit of a hit and miss for me. I'm happy with the wording but not necessarily the alphas I chose. They could do with being a tad taller and maybe not glittery! Although, in saying that they do remind me of funfair lights you sometimes see on piers. I think the pearl dots help some with that too!


It's not too bad a layout to say I've not scrapped in about five or six years...there's a few things I might tweak. The bottom half I'm pleased with, but the top right hand corner and title I'm still undecided. I think I'll add a smidge of journalling in and see how it looks!

So that's me for this month, I've really enjoyed working my way back to scrapping again and in time hope to improve. Anna's artwork is so versatile and easy to use, it piques the creative in me and I find myself working away on something before I know it! 

Till next time guys! x
Jeni


Sunday, 20 August 2017

Grace's Cat Journaling and Planner Projects


As a cat person, who also loves florals, this kit was pretty much perfect for me. So I wanted to create quite a few projects with it.  


The first was a 'scrashbook' page, one of my (many!) forms of creative journaling that incorporates styles of scrapbooking, smashbooking, art, and creative journaling. I chose some photos of my cat, Conan, in the garden and journalled about how much he loves to be outside.
I added colour to the page by dabbing some pink acrylic paint on with a foam brush, then I journalled on the back of the card and attached  it to the page with some paw print washi. Then it was sticker time! Here are some close ups:


I used this paper from the Brimbles shop for my background, as well as a journaling card from a cat kit which is sadly no longer available. 


I just LOVE layering stickers in little clusters!  Here is the finished layout, there is also a process video for this if you'd like to watch.


As for my other projects, I did a planner spread, of which you can watch the plan with me video here


Then I created a page marker for my planner. I did use my silhouette cutting machine to make the page marker, which I appreciate not everyone has, but you could easily make something like this on your computer and fussy cut it, or simply attach alpha stickers to the top of some card and laminate it. 


And my last little project, because I only had one decorative floral sticker left, was to make a mini divider/tip in for my planner for the section where I keep track of my cat's important details and information. 


On this one I dabbed some black ink (just using my fingertips) onto on of the cat stickers so they'd contrast (also Conan is a black cat!).

And that's it! And after all that I still have a handful of stickers left to use. Thanks so much for reading and catch you all next month <3 span="">


Grace <3 span="">
@ms.paperlover


Saturday, 3 December 2016

Autumn Scrapbook Page


Hi everyone!

I'm back (after what seems like forever) with a 6x12 scrapbook layout using the beautiful October Brimbles box, and a few autumn-themed bits from my craft stash. I love autumn, my little pooches and I have had some lovely walks over the last few weeks, and this box was perfect for scrapping the resulting photos. 

I went for a 6x12 layout this time, as it's been a little while since I did a traditional 12x12 page and sometimes that large, blank space can be overwhelming. I had the cardstock with leaves sitting in my stash, so I cut it in half and used that for my base. 


I used a mix of stickers, ephemera and enamel dots from the box to create a little cluster behind my photo, along with a kraft envelope, doily and tag from my stash. I attached more photos from the walk to the tag, which creates a fun, interactive element to the page. I used lots of doodling too, which I think adds a "finished" look, and is something a bit different. 


I finished off the layout with some journaling and a title from my stash, and I'm so pleased with it! The October box was a joy to work with. There's a video of the process too, which you can find on my youtube channel here.

What projects have you made this month?

Chloé


Thursday, 21 July 2016

Scrapbook Layouts with Zinia


Hello everyone it's Zinia here from Abstract Inspiration and today I want to share with you a project I created using the July 2016 stationery Brimbles Box. Now I do understand that the boxes are mainly created for planning but when I saw these beautiful 12x12 exclusive papers I couldn't help myself so I went ahead and created a scrapbook layout.


I actually decided to also play with some mixed media supplies. By the way if you didn't notice, Anna added a bunch of amazing mixed media supplies in her shop recently and I'm using some of them in this layout.

I used one of the pattern papers as a base and I covered the middle area with a very thin layer of gesso. Then I picked some Dylusions paints in Bubblegum Pink and Fresh Lime and I colored a small amount of texture paste. I also created a third color using one of the Tattered Angels Gimmer Mists that I had in my stash.


I applied the colored texture paste on my page through a stencil, creating three lines of color. Once the texture paste was dry, I used matching mist colors with the packaging technique to add some more color on top of the stenciled images.

Then I grabbed a bunch of the ephemera pieces and arranged them on the page following the mixed media colors. I really liked the ice cream that Anna design on the cut apart paper so I decided to cut it out and then use a correction pen to go around and cover the black outline to make it match the design of the ephemera pieces better.


So thatís it. I hope you got inspired to do something fun with your Brimbles box supplies, see you again soon.

Feel free to stay in touch with me through social media: Blog ï Instagram ï Youtube ï Facebook ï Pinterest ï Twitter

Tuesday, 12 July 2016

Baby Scrapbook

Now you all know about the small person in our lives, I thought I would share with you the scrapbook that I bought. This is a look at it before anything has been added as I thought some of you might be interested if you are looking for something similar. Due to family privacy I will not be sharing any of this once photos and information are in it and I hope you can understand that.


Wednesday, 15 June 2016

Project Life scrapbooking


Hello everyone!

I'm excited to be back on the Mrs Brimbles blog today, even though I've only got a short little post for you. I thought I would show you, again, how you can use your Brimbles Box supplies for Project Life scrapbooking. I absolutely love how versatile the box contents is! I was even more excited this month, as Anna included several 3x4 cards in a nice thick cardstock. They're super easy to write on with any pen, and the perfect size for pocket page scrapping.


Look how cute those little babies are (don't worry, they're allowed to be in these photos!) and look how fab the 3x4 cards are for backing your photos. The summery colours were perfect for these bright, birthday party photos, and the patterns are so pretty that I didn't really need to embellish at all. I just used a little bit of washi, also from the June box, and some die cuts from my stash.


Here's a funny story for you... don't put a disposable barbecue on your glass garden furniture. I did try and tell my boyfriend to take it off, but as you can see from the journaling, he didn't listen. The letter stickers from the box were great for creating a bold title, and the card had a perfect date spot too,


I used another of the 3x4 cards as a journaling spot, and I embellished these two cards with those adorable enamel shapes from the box, as well as adding some puffy stickers and die cuts from my stash.

So there you have it! Another week of project life documented, using Anna's gorgeous boxes. I hope you enjoyed!

Chloé x


Thursday, 2 June 2016

Creating a Mini Scrapbook


Hello everyone it's Zinia here from Abstract Inspiration. Today I want to share with you a fun little project I created using my May stationery box and although it's branded as "stationery" that doesn't mean you can't use the goodies for a bunch of different crafts.

When I first saw the sticker sheets that were included in the box I knew that I wanted to create a minibook with them. The past year my dad has really been into gardening and he transformed our terrace into a little paradise. So I wanted to add the photos of this transformation into a little DIY album.

mrsb-familymini-1

To go with the stickers, I picked some 4x4 cards and frames I had in my stash from an old We R Memory Keepers collection called "Farmer's Market". I was pleasantly surprised to see the stickers matching perfectly with the colors and patterns of that collection.

mrsb-familymini-2

mrsb-familymini-3

I mounted some of the stickers on foam dots to add some more dimension and interest to the pages. I also occasionally added some strips of washi tape. The black and white polka dot was actually included in the October Brimbles Box of last year.

mrsb-familymini-4

mrsb-familymini-5

As you can see I didn't really do a lot more than just adding the stickers to embellish the cards. The designs are so pretty that I didn't need to struggle and over embellish them.

mrsb-familymini-6

mrsb-familymini-7

The "stories" sticker is also from an older box. You would probably have a hard time guessing which one it was so I'll just say it. It was the November box which was actually Christmas themed. There are so many Christmas and holiday themed supplies you can totally use all year round†it's fascinating.

mrsb-familymini-8

mrsb-familymini-9

I punched to holes on the side of the cards and tied them together with some thin rope. I really love the look of it. It was an extremely fun and easy project to put together. If you don't have printed cards you can totally do something similar on plain cardstock. These stickers are so freaking adorable that will make anything look pretty.

So thatís it. I hope you got inspired to do something fun with your Brimbles box supplies, see you again soon.

Feel free to stay in touch with me through social media: Blog ï Instagram ï Youtube ï Facebook ï Pinterest ï Twitter

Friday, 6 May 2016

Journal Pages / Smashbooking & Memory Keeping


Hello, fellow Brimblers! It's Charlie. I'm excited to be back on the blog!

Today I'm sharing some pages from my journal with you. This is a relatively new project for me - although I do journal daily I don't currently use it as a memory keeper as such. Feeling very much inspired by Anna and Geraldine at the Cambs Planner Con last month I decided I would have a play and a tinker. I've used a standard size insert for my first book. It originally came with my Webster's pages TN but I'm a cahier size kind-a-girl in my main planner so I've swapped it out to use in my journal. Now, there's no denying that it's absolutely beautiful just how it is, but I really wanted to put my stamp on it and add a few embellishments before starting out. So, what do you do when you're starting out? Arm yourself with everything possible! Project life cards, stickers, ephemera, scrapbook paper, washi tape... oh, come on - you know you hoard it all too! p.s don't forget the photos!

  memory Keeping {seasaltandpaper.com}

memory Keeping {seasaltandpaper.com}

memory Keeping {seasaltandpaper.com}

memory Keeping {seasaltandpaper.com}memory Keeping {seasaltandpaper.com}

memory Keeping {seasaltandpaper.com}

memory Keeping {seasaltandpaper.com}

memory Keeping {seasaltandpaper.com}

Products Used: (All from mrsbrimbles.co.uk)
I'm super pleased with the way it turned out. It's an awesome way to use up all the pretty ephemera I'd forgotten I had! Plus, it gives me the perfect excuse to pap all the beautiful people in my life. Happy memories in a book - Perfect! Charlie xo