Showing posts with label how to. Show all posts

Tuesday, 11 November 2014

Using watercolour in my Fauxbonichi


Last Tuesday I shared with you my new Fauxbonichi and I was met with some lovely lovely comments from you guys both here on the blog and also on YouTube not only welcoming me to the Hobonichi / Fauxbonichi community but also about my style of journalling in said book. I have joined the fauxbonichi group on Facebook (although I don't use facebook all that often) and have been looking on Pinterest and watching flips on YouTube. I am really loving how so many people are embracing this style of journalling far more than  people have with other journals and I hope everyone keeps it up as I love looking at what everyone is creating!

Some may argue that this style of journalling is not new and has been around for years which is true but I am all for anything that gets people to journal more and get creative so bring it on I say! I for one am thoroughly enjoying my journal time of an evening.

Some of the comments that I received were also about using watercolours in my fauxbonichi. To recap the book that I am using is the leather look grid notebook by Paperchase which I actually purchased on Amazon but I believe Barnes & Noble stock one that is very similar. Now I have been using watercolours for years and years, the ones I use are by Winsor & Newton. People were both concerned and interested about using watercolours in the journals on non watercolour paper. In my experience you can use watercolour on any paper. Any. The key thing is to practise, practise with your watercolurs, learn how they work and how much water you need to acivate them.

Unless you are doing lots of wet in wet techniques then you can use any paper. The key is to keep the paint / paper fairly dry. The only paper that I have had difficulty with (although not impossible) is cartridge paper as the fibres come apart a lot more easily. As long as you keep the paint and paper fairly dry you will be absolutely fine I can assure you and don't go agressively at it either.

The type of watercolours you use will also affect this but again it all comes down to practise and learning how your media works. Cheaper paints will typically need more water to activate them and will be less pigmented, this means that you will be applying lots of watery colour to your page to get the colour intensity you want. If you can stretch to a better quality set this would be best.

In the video I talk more about this and also show you how I have coloured my page in with watercolour and how it works...

Tuesday, 14 October 2014

Storing scrapbook papers - Ikea Expedit Hack!

Like a lot of people around the World I use the Expedit shelving unit from Ikea to house my art and craft supplies amongst other things. When I first got it I loved it because it was exactly what I needed and I had great fun stocking it all up and getting things how I wanted. As time has gone on and I have lived with it for a while I realised that it wasn't working for me quite the way in which I wanted it to.


Looking on the Ikea website the seem to have changed the name to Kallax but this is what came up when I searched for Expedit.

I love the large square spaces but sometimes they are just a bit too large. I do have boxes and drawers but sometimes they don't quite work for me.

I was expressing my frustrations with Mr B and after nearly risking his own life on opening my paper cupboard (well he did ask if I had any paper!!) we came up with an idea to customise or 'hack' my Ikea unit to suit me.

I filmed the making of it as it is so much easier to talk my way around the unit and show you how it is all looking and what goes where etc.


Basically what Mr B did was cut some wood down into just a little bit larger than 12x12 paper. He then drilled some holes into the side of my unit, pushed shelf supports in and then placed the wood on top.  Rather than my messy cupboard of paper that was turning into a right old jumbled up mess and the paper was getting ruined, I now have a nice neat stack of shelves for my papers to go on.


Each shelf houses a different kind of paper, for example one shelf is plain card, another is glitter card etc. Each thing is seperated so I can easily find what I need when I need it.


I liked it so much that I got him to convert another space for me and in this space I am storing my paper cutter on one shelf, substrates for painting and on the lowest shelf I have 12x12 sheets that are not complete but are still quite large. I have moved my scraps into one of the draws.


This simple project has given me so much peace it is unbelievable. I never knew looking for paper could be so stressful until this system came along. Thank you so much Mr B!!

The only downside is that this has given me lots of ideas in which I could further customise my unit but if it works that can only be a good thing.

Do you have any tips, tricks or storgae solutions for your art and craft materials? I would love to know!


Tuesday, 29 July 2014

Finding my inspiration to journal - Clouds

Following on from last week I thought I would continue to share with you how I find my inspiration from my world around me to journal.

We have been having some really warm weather here but at times it has also been really cloudy and also really stormy. I love the weather and I find it really inspiring, I don't know why but I just do and I especially love clouds. I love cloud gazing and marvelling at the different types and formations. I just love it! I have drawn a lot of clouds in my journals and they take on all shapes and forms. Sometimes I have people swinging off of them and also gazing up, clouds are just one of the things I really love to journal about, take photos of and also incorporate into my Filofax. It is safe to say that I just can't get enough of clouds!


So with all of that in mind, the beautiful clouds and my love of clouds I though it would be appropriate to journal about clouds and share it with you and it also gives me a chance to share with you how I created some clouds previously in my journal that a few of you said you would like to know how to do too.

One minute it was really sunny and the next minute the sun went behind the clouds and it was really cloudy. To me this seemed like the sun was trying it's hardest to shine but every now and then had to go and have a nap in a bed of clouds and this is what inspired my journal page...


How are you getting on with finding your inspiration around you?

Tuesday, 22 July 2014

Where / How to find inspiration to journal

I often get asked from time to time about how and where I find my inspiration from and also people have asked to see how journal pages come together. I haven't really know in what form I wanted to share this in with you all until now but I am finally doing that.


There are different styles of journalling and I tend to do some of them, all of them, a mixture of them depending on what I want to do that day for example:
  • Just writing
  • Art work on it's own
  • Smashbooking (sticking in ephemera like receipts)
  • Scrapbooking (using photographs and embellishments)
  • Collaging
  • Or a mixture like art work with a quote.
Why I am journalling usually infuences the style of journalling that I want to do, again there are many reasons why you may want to journal and for me those are:
  • To document my day / debrief
  • To record keep (momentous occasions like a wedding or baby etc)
  • To process my feelings, good and bad
  • For the sake of it, to art and create for fun and because I enjoy it.
No there is no need to other think this before you start, just open a book and go for it, however if you are struggling to get started then thinking about these things can be a great start. For example if we have been on a nice date to a restaurant I would want to record this and that would be the inspiration. I would likely write about what a lovely time we had and then maybe stick a photo in with some cute washi tape and then stick the receipt in. Jobs a good un'. The inspiration in that situation kind of found itself and that is easy.

What about when you want to journal but don't know what about, or if you want to start incorporating art work into your journal etc well then this can be a bit more tricky. Believe me it does up with ease the more practise you have so please don't get disheartened in the early days and give up, keep with it and I promise you that you will get there with inspiration flying at you all the time. There are times of course when you have blocks and that is natural but something will open you up again. If you do have a mental block which I often do, I just sit with my journal and collage. I love to collage I find it very relaxing and soon an idea comes to me and then I just roll with it!


To start to find your inspiration you need to open your eyes to see as well as look and try and be more present in your day and each moment. Think about the situations you have been in that day and enjoy each present moment before trying to rush to the next one. For me I find my happiness in the present moment, enjoying the everyday and the everyday is beautiful. Of course crummy things can happen and do happen but the key to your happiness is how you deal with those situations, cue your journal - process them in there! Documenting your day or having a 'de brief' with yourself is a great way to process everything that you have been through that day and helps you to clear and refresh your mind.

Every life tells a story and every story is interesting. You may not think it at the time but believe me it is! When in a few years you pick your journal up again you can look back and see how you have changed and grown as a person. Both sets of my grandparents passed away when I was young so I only remember them through a childs mind but I would love to read their journals (if they had them) to find out what life was like for them. How interesting would it be to know about their everyday lives, what they ate, what they wore all that kind of stuff. Of course there may be things that you don't want people to see in the future and that is fine, you don't have to leave your journals behind and of course you should set up boundaries with your family members for your privacy where your journal is concerened. Mr B keeps a journal and we are both respectful of each others journal space.

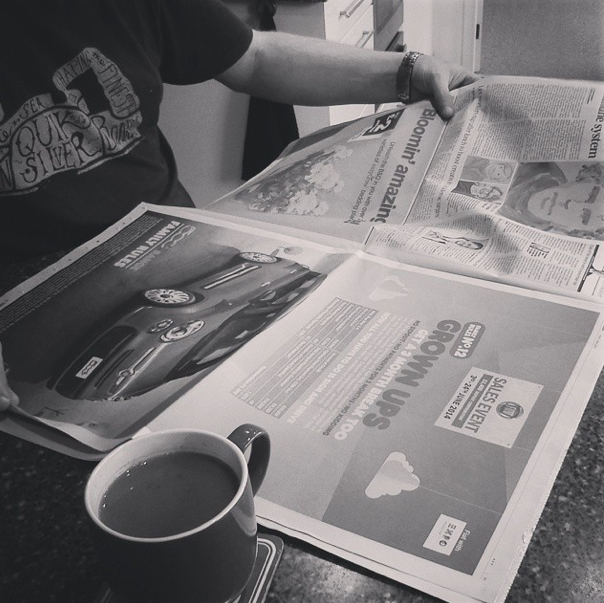
So start to find the inspiration in the everyday. The above picture shows Mr B on a Sunday morning having a cup of tea and reading the paper. He had had a busy week and work and on the Saturday so the Sunday was really nice to chill out with each other and it was some really special quality time together. Of course I really liked seeing him so relaxed and contented to I took this instagram snap of him which I love, it is so arty and in the journal it went along with some writing about that moment.


So moving on to my process of how I journal and how I find my inspiration and turn it into a journal page. I don't or haven't in the past eaten anywhere near as much fruit as I should, I am so bad at it but that is just the way it is. In the past week or so I have really upped my fruit and I am really proud of myself for doing that and I have gotten to the point where I am really enjoying fruit and I am actually craving it now. I love it! I never thought it would come to that being someone who really wasn't that interested in fruit. So it is so momentous for me I felt like I wanted to capture how I felt about it all and what it all meant to me. I had just been and bought some more fruit and it was a hot day and it all made me feel very happy. See more of my thoughts on this and how I put this journal page together in the video below...


I hope you found it interesting to see how I gathered my inspiration and then turned it into a journal page. I will do a little series of these to help get you on your way so you can see how I do it and hopefully gain some inspiration yourself.

If you are not sure if journalling is for you or not but you are just tempted by it, or indeed if you want to get into journaller or just have a refresher, I have a playlist over on my YouTube channel of inspiring videos all about journals. I just you go check it out as then you don't just have to take my word for it but the inspiration from many other people that journal too. Click here to go to that playlist.

Friday, 11 July 2014

How to sew a zip pouch / purse / pencil case to use on the rings of your planner - Filofax Friday


 Following on from last week where by I showed you how I was using my pocket Saffiano as a purse / wallet, this week I am sharing with you how I made the zipped pouch.


I am using mine to keep my loose change as well as a hair band and hair clip as you can see! However I am also going to be making one in a larger size for my personal and A5 to use as pencil cases. I might even buy a cheap pencil case and cut open the bottom and then re-sew it up as I think this might end up being cheaper and easier to do than buying fabric and a zip!


I recorded the making of the purse so that I could share it with you too but I also took photos as I thought you might want to be able to refer back to this easier and sometimes it is easier to see in picture form.


What you will need:

  • A pair of good sharp scissors for cutting fabric.
  • Fabric in your choice of colours / patterns
  • A co-ordinating cotton
  • Needle
  • Pins / Clips
  • A 4inch zipper (for the pocket size, please measure for larger sizes)
  • The acetate / flyleaf that came with your planner, failing that a piece of card hole punched will do (acetate / plastic will be more durable though!)

How to:

Firstly you will need to start by measuring your fabric and cutting it out. You will need two pieces of fabric cut to 13cm by 8cm.

Next take one piece of your fabric and place it 'good side' up facing you, then place your zipper 'ggod side' facing down making sure to line up the two outer edges (see photo 1). Pin or clip your zipper to your fabric and then sew approximately 5mm in from the edge in a running stitch.

When you have finished you will be able to flap your zip back over the way to see that both 'good sides' are facing you so you know you will have done this correctly (see photo 2).


Next you will need to line up your other piece of fabric to your zipper. Start by lying the other piece of fabric out 'good side' up along side your already stitched together fabric, then flip your pieces over so that your two 'good sides' are facing each other (see photo 3). You then need to pin the zip in place and sew along the edge in the same way you did for the first piece.


Now you have the zip sewn in it is time to sew up the sides. Keep you 'good sides' of fabric together, you will want to sew on the reverse so that when we turn it back the edges will be all neat and tidy. When you come to fold your fabric over to sew you may find that you need to crease your zip and push is down (see photo 4) so that you can line your side edges up better. Again pin in place and sew each of the two side edges together.


Once you have sewn your sides together you MUST now reach in and unzip the zipper. It is important that you do this otherwise you won't be able to do the rest and your pouch will be ruined. You have been warned!

Now take your hole punched acetate and trim off alongside the edge that has not been hole punched. You will need to trim off most of it just leaving a couple of centimetres from where the holes have been punched. It is better to leave too much than not enough as you can always trim this down again at a later stage.

Once trimmed, insert your acetate into the unsewn hole (the bottom) of your pouch. Ensure that it is straight and I use a clip to hold it in place because it can slip around a bit. You want to make sure that the side with the holes in is on the outside of the pouch and that you have the rest inside the pouch. (See photo 5).


Now go ahead and sew approximately 5mm in from the edge. Give the acetate a tug to make sure that it is nice and securely sewn into your pouch. You will have to use a bit more pressure to get the needle through the acetate and the fabric at the same time so just watch you don't prick yourself.

Once you have sewn up and tied / cut off your thread you can now turn the poouch outside in! You may have to tease and work the acetate through but it does come through fine. Poke out the corners and flatten it out.

You now have a zippered pouch that you can put into the rings of your planner and take along wherever you go!

I hope you enjoyed this tutorial and have lots of fun making pouches! I think they are a little on the addictive side and know I will be making more!

Tuesday, 17 June 2014

My New No Pressure Journal

If you are anything like me or you are into journals yourself, you will often find that your journals change, how you journal changes and you you feel about journalling changes too.  I go backwards and forward and in and out of love with not just the different types of physical journals I have but also how I am journalling in them. I guess different things suit me at different times and for different reasons.

Next week I will do an update on my current journals but just to give you a brief idea of my current journals, I am using an art journal and a 100% written journal but I was finding increasingly that I wasn't having any motivation for my written journal, I was finding that I didn't have the time, or perhaps more importantly that I wasn't finding or making the time to journal and when I did I just wasn't feeling it or in the mood.

Then one day I decided to set myself a no pressure journal.


I have a few new, empty notebooks / journals on my shelf and so I just went and grabbed the first one I felt drawn to with little thought into it, this was to be my no pressure journal so I didn't want to spend ages pondering over the cover, the paper quality the size and all that jazz. I was creating a new way of journaling, well new to me anyways.

So I set myself some rules for my no pressure journal:

No pressure to write
No pressure to art
No pressure to decorate at all
No pressure to have beautiful neat handwriting
No pressure to use any type of pen
No pressure to write long entries
No pressure to make eloquent entries

I told myself that I could just write whenever and wherever I wanted, multiple times a day if I wanted to. I can just grab any pen that is kicking around the house and just write until I want to stop writing. If I run out of time, or motivation I can just stop and not worry about it making sense or having to pick up where I left off the day before.

This is to be my no pressure, 100% fun journal and you know it is. I am finding myself wanting to pick it up and write in it all the time. Sometimes I will just write a sentence if it comes to me, other times I will write several pages but above all I am not worrying about it and just enjoying the process. I think this is a great tip for those just starting out or wanting to start journalling. Don't overthink it and don't worry about hoarding that beautiful notebook or worrying about not making it look nice and pretty. Who cares! It is just a notebook, it is there to be written in and loved.

I have been journalling for years and often go in peaks and troughs with my journals but I think you need to enjoy it and not force it. If you are forcing yourself to journal you are not being true to you and your reasons for journalling are all skewed. A journal is your companion for telling your woes, your fears, getting negative emotions out, rejoicing in the good times, documenting your life and record keeping. It is all there or should all be there, the real you, the place where you can truly be you and not worry about what anyone else things, so why should you worry about coherrent sentences? You shouldn't, you should just write, write whatever needs to come out and just go with it!

I hope that has helped you in some way, let me know if you have various journals that you use for different reasons, I would love to know.

If you would like to know more about how and why I journal you can watch this video. This is a video that I created in May 2013 but I realise that newer subscribers may not have seen this before and may find it interesting.

Wednesday, 4 June 2014

Forraging for Elderflowers & Making Cordial and Fritters


I just love this time of year, I like going out for a nice walk and seeing what bounties I can forrage! Since we moved to this house back in June last year, I have been scouring the hedgerows during each of the seasons and making a note of the goodies that will be on offer at different times. I love to pick and make my own wherever I can for a couple of reasons. One I take great pleasure from a walk in nature and the process of making it, I think it is a rather wholesome experience and almost meditative really. Secondly you know exactly what has gone into the making of it, no nasties! and lastly it is actually cheaper, the cost of the ingredients for the quantity made is far cheaper than what you would buy in the supermaket so making your own is win win all round really.

Where we live there is an abundance of Elderflower everywhere. Elderflowers are usually out from late May to July and are just simply delicious as fritters and made into cordial. Well those are the two things that I usually make from them but there are plenty of things you can do. Mr B is not massively keen on elderflowers but I love them and at some point I would like to try my hand at champagne and then look into other recipes like jelly etc.

I thought you might like to come along with us as we forrage for the flowers to help you identify then if you would like to have a go and then back to the kitchen to make cordial and fritters. Keep reading if you would like the recipe to make at home yourself.


Elderflowers are just so pretty with their frizzy little flowers and they look so lovely paired with the lemons don't you think. I am so glad I stopped this little ladybird before she went into the pot poor thing and was put out to graze in the garden!


Elderflower Cordial Recipe

To make approximately 3 litres

40 heads of elderflower
3.5 Kg sugar
2.5 litres water
4 lemons
Bottles (pre-sterilised) - Glass looks pretty but you can also use plastic and if you use plastic you can also freeze the cordial for use later in the year, just make sure to leave a gap at the top for the cordial to expand in the freezing process.

1. Shake the elderflower heads to remove any bugs and beasties and also to shake off dead flowers and pollen
2. Trim as much of the green stalks off as possible as these can make it taste more bitter
3. Put the flowers into a large bowl. Slice up the lemon and add this to the bowl with the flowers. If you would like the cordial to be less torte, use fewer lemons!
4. Pour the water into a large saucepan, add the sugar and slowly heat.
5. Once the sugar has dissolved, pour this into the bowl over the lemons and the flowers and savour that wonderful smell!
6. Cover with a clean cloth and leave to infuse for 24-48 hours stirring occasionally.
7. Pour into clean sterilised bottles using a sieve or muslin cloth and a funnel and label.

Can be stored for up to one month or it can be frozen in batches and defrosted to use when required.


My tips and how to identify the plant

Elderflowers can be harvested approximately End of May –Early July.

Once you know what elderflower looks like, you always know. That may sound silly but now every where I go I am like, ooooh there’s one, ooooh fancy it growing there. It becomes an addiction.

The main plant that you could confuse elder with is the Guelder Rose. The guelder rose however is a much smaller shrub. The branches of Elder are very brittle and the bark is slightly corky looking. You can also tell the elderflower apart from the guelder rose by the leaves. Elder  leaves have finely serrated edges on a stem with two or three pairs and then a single leaf at the end. The Elder flowers are individually very small - the whole flower head being of a larger spread than the Guelder Rose. The latter has much larger individual white flowers open around the outside of the flower head, and smaller flowers very similar to the Elders in the centre of the flower head. Leaves are totally different to the Elder, being broader - a bit like a Field Maple shape.

Elderflowers smell of what can only be described as being “Tom cat ish” if they smell too much like tom cat then they have gone over and shouldn’t be used. Anything you make with gone over elderflowers will smell equally noxious!

The other plant that you could perhaps mistake them for is the white cowslip.

I would recommend that you harvest from as high as possible to avoid the concern that a doggy may have already paid a visit and to ensure that you are not harvesting cowslip. Also as ever avoid harvesting from a bush that is potentially polluted, from by the side of a road for example.

Remember to only take what you need and to spread it out over several bushes. Leave plenty of flowers to enable the growth of elderberries.

And always ensure you have the land owners permission.

ENJOY!!!!

Friday, 23 May 2014

How to make a Plushie Bunny Paper Clip / Page Marker - Filofax Friday


I thought this week for Filofax Friday that I would share a little crafty tutorial with you. I follow a lady on Instagram called Itsfluffystuff and she posted a couple of pictures of plushie paperclips that she was selling and I fell in love with both the cloud and the fox and just had to have them. So I ordered them from her Etsy shop and they came all the way from Hawaii! They are so cute and so very well made and they are just perfect for using in my planner when I am going with that theme for the week. I do love them so much.

I also use them for book marks as well as for my Filofax. I love them because they stick out the top of your planner so you can easily identify what you are wanting to mark and when I use paperclips on my week, I can also attach extra to do notes or receipts in there.


Well you know how much I love my bunnies, I mean, I draw them everywhere and they are always appearing all over the place. Well it got me to thinking whether I could make plushie paperclips with my own bunny design. So I had a go, I made a few mistakes but I worked out how to make them and I thought I would share this with you in a tutorial so that you could make them too and if you didn't want to make them or you just like the ones from itsfluffystuff, then you could hop over to her shop to get some. (This is not sponsored or anything, I just like spreading the love when I find stuff I like!)

What you will need:

  • Felt or fabric - only a small piece is needed but you will need to cut out two head shapes from it and they really don't need to be very big.
  • Scissors
  • Pencil or pen
  • Eraser (if using pencil)
  • Small scrap of card
  • Masking Tape
  • Paper Clip (large preferably)
  • Needle
  • Embroidery thread in black, pink and one to co-ordinate or contrast to your fabric
  • Soft toy stuffing (very teeny amount)
  • Cotton bud
  • Pink ink pad or blusher

How to make your plushie:

A step by step video instruction is below but here are the written instructions for you to refer back to:

1. Draw your bunny head out onto your fabric. (You may want to refer to my 'how to draw a bunny' series). Cut your head shape out of your fabric and then trace around this and cut another out so you can two identically sized / shaped heads.
2. Erase any lines from your heads.
3. Put aside one of your head pieces. Cut out a small piece of card to fit inside the bottom of the head and place it on the bunny. Tear off some masking tape and adhere your card onto your bunny. Next adhere the top part of your paper clip onto the card, push down to really get into the nooks of the clip. Overlay another piece of masking tape in a different direction to make sure the clip is stuck to the card and the card is stuck to the fabric. Place to one side.
4. On the bunny head that doesn't have the paper clip attached, sew on your nose and eyes.
5. Place your face on top of your bunny head and using blanket stitch start sewing your two pieces together. Remember to leave a gap to stuff your head.
6. Using your pencil stuff the stuffing through the opening, you may want to do this little at a time.
7. Close the opening by finishing off your stitch and tie off when you have completed.
8. Use your cotton bud to apply your pink cheeks to your bunny with either blusher or your ink pad.


I really hope you enjoyed this little tutorial. I am very much a novice sewer but have really enjoyed making these even if they are a little bit wonky in places, I love them so that is all that matters! If you do make them I would love it if you could tag me in your photos on Twitter or Instagram as I would love to see the ones that you have made!

I am off to practice more sewing and to see what other characters I can come up with! If you would like to see more bunny sewing from me then head on over to http://www.littlepandacrafts.blogspot.co.uk/ next week where I am guest blogging with this little lady...


Tuesday, 6 May 2014

Painting a Watercolour Blue Tit (Tutorial / How to)

We have been inundated with blue tits in our garden. Well not just blue tits but also great tits and robins. It is lovely. I love to just sit in our back room whilst having my breakfast or my elevenses and watch them feeding on our bird feeder. There is something quite relaxing about watching the little birdies flitting around and I have found it to be really inspiring. In fact I took my art journal and sat and painted a blue tit whilst watching them go about their business.


I rather liked how he turned out but more over I thought you might like to also paint a blue tit so I thought that would give me a great excuse to paint another one and film it as I go! The picture on the left was the original one that I painted and the one on the right was the one I did whilst filming. You can see that they are not identical which I like. No two birds are alike and these little guys each have their own personalities too, you can just see them shining through can't you.

They were painted on entirely different watercolour paper too. The one on the left, in my journal is on really cheap paper and the one on the right is on more expensive paper. You could really tell the difference with how the paint reacted. That being said I still like the paper in my journal so I am not complaining!

As you can see that are not 100% realistic. There are elements of realism to them but I didn't want them to be real life, I wanted them to be in a cute, quirky, stylised way because, well that is just my style.

So here you go, here is my tutorial or how to paint a watercolour Blue Tit. In the video I go through the materials needed as well as how to actually do it. You can either paint along with me or stop and start as you need to. The video will always be there for you to come back to or refer to later so make sure to bookmark it.


If you dopaint a blue tit and you wouldn't mind sharing, I would love to see it. Just tweet me, instagram, email or facebook me :D

Tuesday, 22 April 2014

I made a new journal!

Following on from last weeks ramblings about whether to make a new journal or whether to buy a ready made one, I came to the conclusion on my own, you will be so proud of me! So here it is! I just thought I would do a video to show the process on how I made it and what it looks like when it is finished.

I am liking it already. No I am loving it and can't wait to get started now. It is filled with watercolour paper and I am chomping at the bit to get it started. Such a change from last week don't you think lol!


Friday, 14 March 2014

Upcycling into your Filofax - Filofax Friday - Week 10

This week I wanted to introduce to you the concept of upcycling in your Filofax or Day Planner. This is something that I did over Christmas in 2013. I received a large chocolate santa in an acetate box with cute snowflakes all over. I sat there looking at the box after having ripped the head off the santa thinking, that would be a really cool book mark / flyleaf for my Filofax. So that is what I turned it into. You can see the vlog I did on that day below if you are interested in that. (I will put it right at the bottom of this blog post as it is not the video for today's Filofax Friday!). I got a box of chocolates the other day and I really liked the pattern on the box and thought it too would make a great bookmark. So that is what I thought I would share with you this week for Filofax Friday - A bit of upcycling into your Filofax!

)

Homework
Again this week there is home for you to complete if you would like to do so. Remember it is not compulsory, no one will know if you have done it or not. I am just setting prompts / tasks for you to help and motivate you in this series. Pick and choose each week whether you would like to do the homework or not it is entirely up to you! If you ever need to ask or clarify anything with me please do get in touch through any of the social media platforms.

1. Start looking at your rubbish in a whole new light - save anything that you like and you think you could turn into something!

2. Make something, just one thing for your Filofax out of a piece of rubbish you have saved.

Download
There is no download this week.

Next Week
See you next week for a tour / set up of my A5 Apex that I use for all my daily life, personal and work related. I know you want a nosey!

Finally...
Thank you for watching / reading folks and enjoy your planning.

Remember your planner will only work for you and help keep you organised and on track if you use it. 

So here is the Vlog video I mentioned at the very beginning of this blog post. You are welcome to watch the whole thing but if you want to see the specific dashboard section in the video you will want to start watching at 4:46 until 10:44!

 )

Tuesday, 25 February 2014

How to Paint a Galaxy Hair Girl

A few weeks ago now I shared in a couple of videos (I think it was a vlog, I can't remember!) my painting I did in my art journal of a girl whose hair was made to look like a galaxy. A few of you said that you liked her and would like to know how to paint her for yourself and would I do a tutorial for you. Of course I said yes and here it is, part one in my two part series on how to draw and paint a girls with galaxy hair.


Tuesday, 4 February 2014

How to Draw (Colour) a bunny - Part 5

I am back with the very last video in my "How to draw a Bunny" series.  I can't believe the series is over, I have really enjoyed it and had a blast drawing and sharing my bunnies with you. I have also really enjoyed seeing the bunnies that you have drawn too and some people have even taken then further and developed other characters with them too. It has all been so much fun.

If you liked this series and would like to see other art tutorials or "how to" from me then please let me know, I am very happy to share when and where I can. I really do enjoy it!

So here we are then, the very last one. In this video we look at colouring in our bunnies adding different tones and highlights.

Happy bunny colouring!

Tuesday, 28 January 2014

How to draw a bunny - part 4

I am back with the fourth (can you believe fourth wow!) video in my "How to draw a Bunny" series.

This week we will be taking the cute little faces that we drew last week and we will be giving them bodies with clothes, either dresses or winter coats. Next week will be the final week where we will colour and shade our friends in.

Happy bunny drawing!

Tuesday, 21 January 2014

How to Draw a Bunny - Parth Three

I am back with the third video in my "How to draw a Bunny" series.


This week we will be taking the cute little faces that we drew last week and we will be adding ears, either sticky up ears or floppy ones. We will also wrapping them up nice and warm with hats and scarves and also sun hats ready for the warmer weather. I love getting this stage and really seeing the characters come to life and pop out of the page. I love just leaving them like this as cute floating heads. For those of you that want to give your bunnies a body and clothes, we will cover this in part four next week.

I hope you are all practising! I can't wait to see the little cuties that you have come up with. I haven't seen any yet and I am bursting to see, so if you would like to share please please please do, I would love it!

Happy bunny drawing!

Tuesday, 14 January 2014

How to Draw a Bunny - Part Two

I am back with the second video in my "How to draw a Bunny" series.

This week we will be taking the face shapes that we drew in week one and starting to make them look like little bunny rabbits by adding facial features and expressions. You will see that only a few very simple lines or marks can totally change how your bunny looks.

I am really very excited to see all the little bunny rabbits that you have drawn so please if you would like to share with me do tag me in any of the social media platforms so that I can see. I am simply @MrsBrimbles on any of them! Or if you would prefer you can email me privately if you don't want anyone else to see.


Tuesday, 7 January 2014

How to Draw a Bunny - Part One.

If you follow me across my social media platforms and have seen my art journals and other art work you will know that bunnies for me are a reoccurring theme. Those bunnies be popping up all over the place they really do.

For a while now I have thought about sharing with you how I draw my little bunny characters and then a lovely subscriber asked me if I would share. Of course I am always happy to share so here is the very first part in a little series on How to Draw a Bunny (in my style). In this first video we will look at imagery of bunnies so we really get a feel for what they look like and to inspire us. Bunnies like humans come in all shapes and sizes so we get to look at different types of bunnies and then start to draw different face shapes.

I hope you enjoy this series and have as much fun drawing bunnies as I always do.

Part two will be published in one weeks time (Tuesday 14th January 2013) so you have a week to practise what you learnt in this video before we move on to the next one. Enjoy x


Thursday, 14 November 2013

How to Put ANYTHING into your filofax

I often get asked how to punch holes in inserts so that you can put them in your filofax. In fact you can put anything you like in. You don't need an expensive six hole punch, just a regular two punch is fine. I show you how!


Friday, 1 November 2013

How to Make & Print your own Custom post-it notes!

I am here with my first ever tutorial! Scary stuff! I hope it comes accross OK and that I make sense in what I am talking about.

So in this tutorial I talk you through how to set up a template that you can use time and time again for printing your own custom designed post it notes. This is really useful for things like shopping lists or To Do lists or maybe you just want ones with pretty pictures on.

You can turn really cheap boring post-it notes into something more asthetically pleasing. It is expensive to buy the really pretty ones all the time so these are much cheaper because you design them yourself!

I use mine in pretty much all walks of life but they are especially useful if you use them in your filofax!

Have fun! Let me know how you get on x