Showing posts with label Daisy. Show all posts

Monday, 31 July 2017

Juicy Journal Page with Daisy


I decided to use my July Brimbles Sticker Club pack in my journal this month, because I have a little pile of photo's I still need to get stuck into my journal. There were a couple of photos that seemed to fit really well with the theme of this sticker pack, so I went for those!


Before sticking anything down I decided to add some watercolour in the background, just to break it up a bit. Plus a few of the stickers I wanted to use had white backgrounds, so it'd help them stand out a bit. I popped the watercolour onto an acrylic stamping block, and then applied it to the page so it didn't have any brush strokes. This also meant I could create a nice dripping effect when I tilted the page!
I used some of the border strip stickers, and some of the boxes to go in the background. Then I just layered up some of the smaller decorative stickers on top of the photos. I left the red circle sticker blank as I will write the date into that when I add the journaling.


Instead of leaving the bottom of the page blank, I added a little cluster of stickers down there, just to balance to the two corners of the page. You can also see that the orange sticker is covering a staple that was showing through from the back of the page. I debated whether to actually take the staple out, but decided to just cover it and hope for the best haha. It's a bit lumpy, and kinda noticeable, but hey. it works for me, so I'm going to leave it like that!


I was going to leave the top left section of this page clear for writing, but I realised the black and white spotty box sticker would most likely make the writing blend in a bit too much. So I grabbed a few of the arrow stickers and popped them in the gap instead. I'll still add some writing to the yellow water coloured section, but hopefully the arrows will help to make it look less like there's something missing from there.


I love the colours of this sticker collection, and I don't think I could have used any better stickers to document these photos. They seem to reflect the mood of that day out just perfectly!
I still have lots of stickers left over from these sheets, so I will most likely use them in future journaling spreads! I might even try using some in my planner too.

- Daisy X


Saturday, 11 March 2017

Daisy' Disagenda Pages


I've not shared much from my Discagenda yet, but I thought I may as well share one of my February spreads today! I used a lot of the things that came in my February Brimbles Box, along with a few of my favourites that I use every week.

A little run down of what my Discagenda is used for, because I don't use it every day. I use this planner one a week on a Sunday to pretty much gather my thoughts and plans for the week ahead. More than anything it makes me sit at my desk, and wind down at the end of the week. I mark out important dates for the week ahead, write things I want to aim to do on certain days, and pop some weekly goals at the side. I then transfer most things across into my bullet journal planner as that's my functional planner. This is purely for me to enjoy sticking down stickers, and creating a pretty spread, plus I've found that it most definitely helps me to gather my thoughts.

I used the check list stickers on one of the sticker sheets in the February Brimbles Box to mark down some things I needed to remember to take with me to my trip to Nottingham. I found that these stickers work best when you write on them with a permanent marker of some kind. Plain gel ink pens just don't cut it. That's not a massive inconvenience for me though, I always have some sort of marker sitting on my desk!

I used quite a few of these little love bug stickers on this spread, they are so sweet! I combined the pink heart/lace style washi tape that came in the Brimbles box, with some brown squiggle washi tape. Then I added a popcorn sticker and the 'Date Night' sticker to mark a bit of chill time with Jack. He works in hospitality, so his shifts usually mean the closest we come to a date night is collapsing on a sofa with a film and stuffing our faces with popcorn. I'm totally fine with this being our version of a 'Date Night' though haha!

Over here I added a few of the decorative teardrop shaped stickers, I've dotted some of the pink washi tape about too, and also popped another love bug down! I used the arrow sticker to point out we were going to Nottingham for a night. I definitely love the variety on this sticker sheet. I'm able to use this sheet in both my planning, and journaling!

So that's how my planning spread turned out, I definitely love using things that correspond with one another in this planner! The Brimbles box is brilliant for this!

- Daisy X


Tuesday, 7 February 2017

Travelling Notebook Page Decoration!

I
 spent so much of my time at the end of 2016 sorting things out with the house, I didn't have a chance to fully appreciate my Brimbles Boxes during those months. So this month I decided to dig everything out and just go to town with my Brimbles Box goodies!


Today I'm sharing a page spread I created, in a travelling notebook! This is someone else's travelling notebook, and about 4 or 5 people had already contributed to it. I chose to decorate two pages in this notebook as the owner had let the contributors choose how many pages they wanted to do.
I dug out my October Brimbles box, a few bits from my Brimbles Advent Calendar and also some things from the January box.

The October box was very autumnal themed, so there was plenty of orange popping up! I decided to go with this as the main colour, and then choose things to work with that. 


I used some of the orange washi tape and placed it randomly on the two pages. I used this floral jar sticky note from the Advent box to stamp one of the positive phrase stamps on to (from the January box). I tend to use decorative sticky notes, more like ephemera, than I do as sticky notes.
I used one of the marble sticky notes from the January box, along with a red circle spotted die cut from the October ephemera pack behind the stamped sticky note.

Once I'd arranged and stuck all these down I popped some enamel dots around the place, and stamped an arrow from the same clear stamp set in the January box, across my layered ephemera.


Last of all on the opposite page I stuck some more of the spotted red washi tape in the top right corner to help balance the two pages, and then chose some die cuts to pop on the page.
Seeing as the pack was very autumnal themed there were a lot of die cuts referring to autumn experiences. So I chose some which were more generic and would fit this time of the year just as well. I wanted to make sure these pages reflected here and now, as the travelling notebook is trying to capture where I'm at right now.

'Snuggle Weather' fit with the wintery weather we are currently having, and the pie.... well the pie just looked warm, and fit well in the corner ahah.

If you want to know a bit more about Travelling Mail, then feel free to take a look at the Travelling Mail Facebook group here.

I hope this helped to show you how you can incorporate all your boxes together, no matter what time of the year it is!

- Daisy X

Friday, 3 February 2017

Goal Setting inspiration board (Planner)


As soon as I opened my January Brimbles Box, I knew exactly where I was going to use it!
I recently got myself a new work planner in the Kikki-k sale, I went for a nice smart black one this time. The whole 'new year, smarten things up' vibe got me good. But seeing as black, gold and white was the main colour scheme, it meant that the January Brimbles Box was just perfect for this planner!


I decided to make myself some plain dividers out of white card, because even if I move out of this planner, or change up the dashboard somewhen, the sections in this planner will always stay the same. So it makes sense to have something that will go with any colour scheme, rather than remaking them each time.

I used the white marble 12 x 12 card stock to make a dashboard. Then I used one of the journaling cards that said 'My goals for the year', to make a little decorative mini dashboard.
I decorated this mini dashboard with various things from the Brimbles Box, including some of the Black floral washi, circular phrase stickers, and some of the clear stamps.


I put together the DIY marble circle paper clips, I used a bit of E6000 glue and they stuck to the gold paper clip really well. I decided to attach the black marble one to the top of the mini dashboard to break up all the white marble a bit.

It was a very simple DIY but sometimes they are the most fun! Being able to quickly make a few random pieces into something useful, and pretty, is a really enjoyable, and relaxing process.


Of course I had to attach the amazing snowball charm to the planner! It's really nice to look over at my line up of planners and see something a little different, compared to the usual dangly charms I have attached to them. The large lobster clip on the end of it is really handy too, if it's getting in the way at all, or I want to move it about for a photo I don't have to open the planner rings to do so! I just unclip it and move it about.


When I have a small space of white that I want to fill, I find this technique of stamping very handy. I choose one stamp that will fit well in the gap, in this case I chose the arrow stamp. Then with the first stamp (straight off of the ink) I will place it in the largest gap of white space. After this, without re-inking the stamp, I will stamp the leftover ink around the first stamp in any remaining gaps. It creates a sort of fading effect and fills a gap without being too intense.

I'm really happy with my current work planner setup, I love it when a planner is all colour coordinating! The Brimbles Box is definitely perfect for this. Anna's does a great job at designing the products in the boxes so they all coordinate brilliantly!

- Daisy X

www.mygreencow.co.uk YouTube Channel: MyGreenCow Instagram: @mygreencow Twitter: @mygreencow Facebook: MyGreenCow

Tuesday, 29 November 2016

Creative Journalling with Daisy


For this journaling page, I decided to use the contents of my September Brimbles Box to decorate it!
Since I moved late September I didn't have a chance to dig in and have a play with the box, so I've been looking forward to using the contents for a while!


I had a few photo's from a lovely walk I went on by myself to take photo's. This is something I thoroughly enjoy doing, and have always found very relaxing. It seemed like the perfect photo's to use alongside my September Brimbles Box, seeing as the box was themed around feathers, dreaming and feeling free!
I loved all the muted colours in this box, it was a nice change from the usual bright colour schemes.


The 'young' 'wild' & 'free' stickers came from the 12 x 12 sheet of stickers in the box, and I used my watercolour palette that I'd also bought from the Mrs Brimbles shop, to pop a splash of yellow down behind the photo. Seeing as the word stickers had an outline of white, the yellow helped them to stand out from the white page.
I added a strip of feather washi from the box at the top and bottom of the page too, I love this tape! It's perfect to use as a border, but I reckon it'd also work just as well if you were to cut out each individual feather and use them to decorate a page like stickers.


I made the postcard that came in the box into a flap on the page. I tend to add flaps when I know I don't have a load of stuff to write about on the page, but if I were to stick two photos on one page and add decoration, then there wouldn't be enough space to write. It just gives that extra little bit of space that's needed.
It's a quick and easy addition to a page and postcards are absolutely perfect for this! Sometimes they might need a trim to fit, but this one fit brilliantly.


Above is how I decorated the other side of the postcard and the rest of the journal page.
I decided not to carry on with the yellow all the way down the page because it might make it all a little too busy once I've added writing on top.
On the back of the postcard I stuck down some of the beautiful feather scrapbook paper that was in this box, and then picked out a few die cuts from the ephemera pack that was included to collage around the photo.
At the bottom of the journaling page I added some of Anna's stickers, along with a die cut and some washi. I also wanted to try out one of stamps from the stamp set that was in the box. Once I'd stamped it I felt like it didn't stand out enough, the lines were quite thin so I had a go at going over them. It turned out okay, but not quite how I imagined in my mind. It's all good though! Journaling like this gives me a chance to learn and experiment with supplies, so I added some colour to the pinwheel and left it.

- Daisy X


Tuesday, 30 August 2016

Travelling Notebook


So it's been a little while since I've popped up on this blog! Apologies for that, between travelling up and down the country, and preparing to move, things have just got on top of me. I'm getting there though. My face should be popping up more regularly on here from now on!

Today I've got a travelling notebook to share with you. This isn't mine, it's someone elses but I decided to use the contents of the past few Brimbles Boxes to fill in my pages.

If you are unaware of what a travelling notebook is then I have a full blogpost on my blog where you can have a read, just click here.
In short though it's a notebook that's sent around numerous people and everyone fills in a few pages. Then when it's full up, it's sent back to the person who set it off!

On my first page I decided to add one of the Mini File Folders that came in the May Brimbles Box. I used some of the Alphabet Stickers from the June box, and a beautiful floral sticker that also came in the May box. Inside I added my generic info and decided to draw a little map of the UK to illustrate where I'm from/will be moving to in the next month or so (fingers crossed).
Below that I added a 'currently' section, and decorated that with more washi from the past two boxes (Cloud Washi & Floral Wreath Washi). The 'Shine Bright' washi is from one of the recollection tubes of washi.

For the main double spread in this notebook I split it into chunks. There was no real rules of what to put in the notebook, so when I filled it in I decided to add whatever sprung to mind.
Some people choose to list certain things they want people to write about, where as others leave it open to whatever the contributor feels like doing.

I used the Gold Confetti Washi that came in a past Brimbles Box, along with this beautiful mismatched one from Paperchase.
I popped the little 'weekend' sticker by Sea Salt & Paper, that came in my August Brimbles Box at the top, and wrote a little section about the upcoming weekend.
Then I used a variety of stickers from my Mrs Brimbles Sticker sheet that was in the June box, to decorate the rest of the page.

Again over here I went through all the stickers, and picked out a few that would fit well with the bright colours I was using throughout.
I'm really happy with how it turned out, and I hope the notebook's owner likes it!
I thoroughly enjoyed the challenge I set myself to use just things from my Brimbles Boxes.


- Daisy X


Wednesday, 29 June 2016

Creative Journalling


This month I decided to use my Brimbles Box yet again for journaling! There is just so many great things inside, to use in my journal. The colours for this month were lots of pinks and oranges, which I really can't get enough of at the moment.


I decided to print off some snaps of some recent little adventures and moments that have happened over the past few weeks. This will be my last summer living down south on the farm. So I'm making the most of the little things that make me smile, like finding wildlife and eating an ice lolly on the front lawn with my dog. Seeing as there were lots of summery colours in this month's box, it all worked really well with the photos I chose!


I added a wash of yellow watercolour to the background of the page, and used one of the sticky notes to go behind the photo. I then used lots of the stickers from the Brimbles Box to decorate around this photo. I love the black paint dot stickers! They were so fun to use and the fact that they aren't all identical to one another makes them look like you've dotted them onto the page yourself.
The only thing I used that isn't from the Brimbles Box on this section is the Brown Squiggle Washi Tape.

I had a photo if a recent outfit I wore, and the colours went absolutely perfectly with this page. This photo documents the first dress that I wore this year, it was finally warm enough to ditch the jeans! But being England it was too windy to go without tights!!
I used the Pink alphabet stickers from the Brimbles Box to write out the word 'Bold' and the other alphabet stickers were gifted to me, so I'm not sure where they are from.

This was the first time I'd used enamel dots on one of my layouts too, I'm still getting the hang of these! In reflection I think they may have looked better going horizontally instead, but hey! You learn by making mistakes!
The flamingo sticker is from the box, it's one of Anna's beautiful designs! Then the Pineapple Tape is from Paperchase.


Up here I used one of the journaling cards that Anna designed. I love using these in my journal. I thought the phrase on this one also went very well with the photo I chose. I used one of the flag stickers with ice lollies on, which came in my Brimbles Box and is by Sticker Sunshine.
I also stuck a strip of Watercolour Washi Tape down the side too, as the colours matched really well, and I finished that section off with a little enamel heart sticker!


Last of all I popped this photo down here, I didn't want to go too over the top with decoration here as I was running out of writing space as it is!
This was simply a cow that had me cracking up, any time he lifted his head, he stuck out his bottom teeth. It's the little things about living here that I will miss.

I'll have a process video of this journaling spread coming up in a few weeks time, so you guys are seeing this sneak peak first!

- Daisy X

Thursday, 5 May 2016

Creating a planner dashboard


Today I thought I would show you what I decided to do with a few of the things I got in my April Brimbles Box


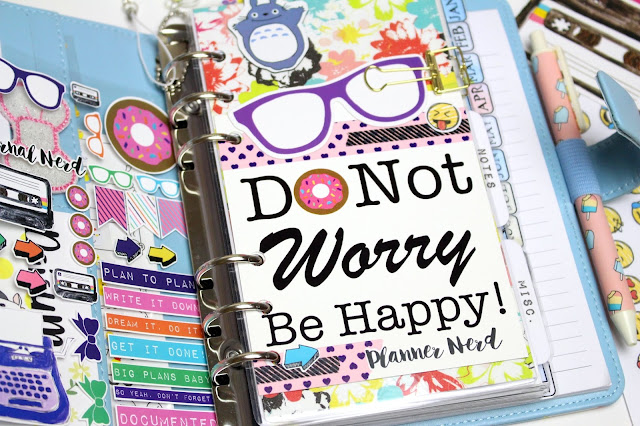
April's box was definitely one of my favourites, with all the bright colours and fun shapes! When I saw the 'Do Not Worry Be Happy' postcard I knew I wanted to do something with it. I laid all the contents of the box out in front of me and tried to figure out what to do with it all. As I was having a bit of a juggle about with my personal sized planner, creating a dashboard for it made sense. Something bright and fun to welcome me when I open my planner.

As with all postcards they are a little too short to fit in a personal sized planner perfectly, so instead of sticking it to another piece of card I had a go at something else I'd thought about trying.

I used the pink & purple heart washi tape, the purple glasses from the planner nerd ephemera pack, some stickers from the planner nerd sticker sheet, an emoji sticker and some black striped thin washi tape from Tiger.

Because the postcard had a lot of blank space, there was plenty of room for decoration!

This is really a very simple process, all I've done is filled in the blank space with pretty washi tape and stickers. But I really love how it's turned out and will definitely consider trying this out on some other postcards when I next change my planner around!

I added the glasses on the top to break up the straight line. I don't know why but when the glasses weren't there, and I put the postcard in my planner, it just looked too straight and almost like I'd accidentally cut something too short. When I added the glasses and broke up that straight line, it definitely completed it.


When I added it to my planner I actually clipped it to another dashboard I had in there already, with a little gold binder clip I got from Tiger. I really liked how all the colours looked together, plus the clip is pretty so it doesn't look too out of place. This means I can easily swap and change the background whenever I want.

If you have some postcards lying around, that you want to make into dashboards. I would definitely recommend finding some die cuts and having a go at combining the two. I personally much prefer how it looks!

- Daisy X 


Thursday, 14 April 2016

Journal Pages in my Fauxdori


With this month's box I decided to use the contents to decorate my journaling pages.
I recently went to see Zootropolis at the cinema with my brother, and seeing as it was a kind of fun film, the April box had lots of fun bright things that just went really well with what I was journaling about! I absolutely loved working with such bright colours, and fun stickers!


These journaling pages didn't have any photos on, I decided to just use the things I had collected during the day. We actually got given a free sticker book and stickers when we went to see the film, so of course I didn't turn that down. It was a lovely day spent with my brother, and I also beat a few anxiety worries, so definitely a day to be documented! Hence the use of the pink 'Documented' sticker on the page on the left.


I of course kept the cinema ticket to stick in! One of the many reasons I like buying tickets at the cinema rather than online, is because you get a 'proper' ticket. They look a lot nicer in a journal or scrapbook! We also got charged for teen tickets rather than an adult, which was highly amusing. I'm nearly 22 and my brother is 19... But hey! All I said was 'two tickets to see Zootropolis please' so I'm not going to complain if they want to charge us less. I used the cry laughing emoji sticker to represent the 'lols' we got out of that.


I used the rainbow dashed journaling card from this pack of ephemera by Mrs Brimbles, to create a little flap on the page. I stuck one of the stickers we got from the cinema on the front, and decorated it with the purple & pink heart washi tape, and some arrow stickers from the sticker sheet that were in my Brimbles Box. I also used from film strip washi tape that I got on eBay.


On the other side of the flap I stuck another one of the stickers we got, and I popped one of the little sticky tabs from the sticky notes that were in my Brimbles Box. I tend to use any sticky tabs that already have words on, like stickers. Because the film sticker was quite dark, the sticky tab really helps to break up all the dark colours. Without it there, it would have just looked really glum and bland.


I decided to keep my bus ticket from the trip to the train station as this was one of the things I was most anxious about doing. It's a nice little reminder that I managed it, and didn't freak out! I stapled this to the page so it could easily be lifted up, and I could put things underneath it.
Underneath I added one more sticker we got at the cinema, and used this orange 'Admit One' washi tape, which was also from eBay, to decorate around it. I added one of the striped flag banner stickers from the sticker sheet in my Brimbles Box to the corner of the Zootropolis sticker. It felt a little bare without something there, so this small addition helped to fill the gap.


At the bottom of this page I wanted to add a little cluster of washi & stickers, just to help balance the pages out a bit. I went ahead and added some more of the film strip & heart washi, and then added this yummy looking donut sticker! Once we got home I ended up having a nap, watching tv & eating 'crappy' food, even though I didn't have a donut, the donut does represent the type of food I went for, haha!


Once I'd done the journaling I decided to go over random words and phrases with the highlighters that came in my Brimbles Box. I love this technique when it comes to journaling, but I've never had more than two colours of highlighter to do it with. Now I have a whole set, so I did go a little bit crazy! I love how it turned out though, there was so much colour going on around the edges of the journaling, the written section looked very bare in comparison. 

Hopefully you enjoyed seeing how I used a lot of the items from this month's box! I really enjoyed using them to decorate my journaling pages! 

- Daisy X


Monday, 7 March 2016

Journaling with Unicorns


I received the Stationery Brimbles Box for February, and inside as I'm sure a lot of you know was Unicorns galore!! I only really got a chance to play around with the content of the box nearer the end of the month because I had so much happen during February. My plans were flipped upside down, but hey! It gave me more to journal about.

I really enjoyed putting together a journaling page using pretty much only products that were in my Brimbles Box, also the overall colour scheme was sooo much fun to work with.


I decided to print my photos off all in black & white because seeing as all the products in the box went so well together, I didn't want to ruin that colour scheme by slapping in some photos that were completely opposite colours. Working with black & white photos definitely makes things a little easier because it's one less things to think about when you are putting a page together.

Most of the stuff I journaled about really wasn't that interesting, it was just little moments that happened during the week. I find that these can sometimes be some of the most amusing to look back on though, so don't ever think that something isn't 'worth' documenting. You journal because you want to document your life, that includes the good, the bad, and the 'boring'!


As always I work on the background and the layout of my photo's before anything else. On here I used a journaling card from a We R Memory Keepers set I got recently from Hey Little Magpie. I used one of the weekly sticky notes, and one of the Unicorn sticky notes, both from my Brimbles Box.

Once I've got things stuck down, that's when I go in with the smaller bits of decoration.

The typewriter font stickers are from Hobbycraft, these are some of my favourite alphabet stickers to use in my journals!
The little heart stickers, the lilac arrow sticker, and the black and white striped stickers were all from my Brimbles Box, along with the pink foiled dot washi tape.


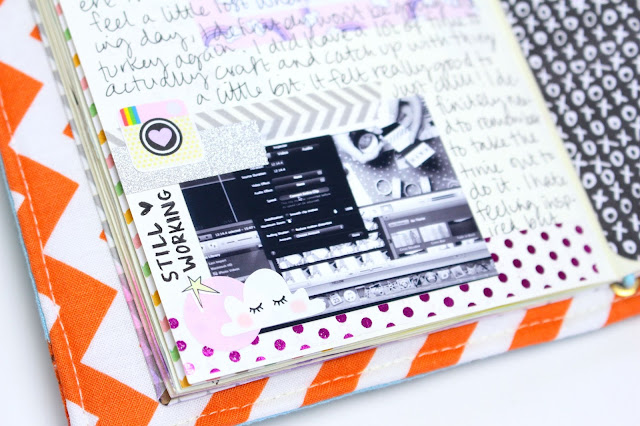
At the bottom here I created a couple of clusters of stickers and washi tape. The grey chevron washi tape is from an older Brimbles Box, the silver glitter tape is from Paperchase. The rest of the stickers I used were from stickers sheets in my Brimbles Box, including the sheet from Sea Salt & Paper.
I filled in the little section of blank space with the words 'Still working', I could have easily left this, it wouldn't have looked too bad, but I like my pages to be busy and blank space does bug me. I chose to write 'still working' because honestly nowadays it doesn't feel like I ever stop working!!


To balance out the clouds I chose to add another one at the top of this page. I again used another Unicorn Sticky note in the background, I looooove how these look these have to be one of my favourite pieces of stationery that Anna has ever designed! 

I whacked on some more washi tape and stickers. I put an envelope sticker on here because even though I didn't mention in the journaling that I went to the post office whilst I was in town, it's a really easy way to remind myself that I did. Even writing this blogpost I was like 'why did I stick an envelope there... oh duh I went to the post office that day, I remember now'.


At the bottom of this page I decided to actually block a lot of the page off with a decorative journaling card (from the same We R Memory Keepers pack). These pages weren't really about something special I'd done, they were just writing down thoughts and feelings about the week. So I just left a random amount of space, and wrote until there was no more room. 

I wanted to just have fun with some of the other bits and pieces I got in this month's box, and
I really like how little clusters of stickers and washi tape look, it definitely brightens up a page and gives you something to look at.

I hope you liked seeing what I got up to with this month's box! If you haven't already subscribed to the Brimbles Box then I highly recommend doing so, they are so much fun to receive each month, and there's always plenty to use for different projects.

- Daisy X